1


Hey guys, I’ve got little to no knowledge on 3D printing and even less experience, so go easy on me. I will most likely be using words I don’t understand.

I live in a hot and humid country in the EU, and given my circumstances and the aforementioned lack of knowledge, I’m considering a closed enclosure model from the company everyone hates because it’s cheap, available, and famed for its ease of use.

I’m no stranger to tinkering with everything, but I do want to get started with something that’s just plug and play (or close enough to it). And even after I jailbreak it (which I assume is possible?), I really don’t want the tinkering to be part of the hobby itself.

My questions are: Size: Would I regret getting a 256x256x256 mm^3 sized one? Most prints I’ve seen fit easily, but there are a few that require more space.

Filaments: Where to buy, how to store, are all of them compatible with extruder-type printers? How do I check?

Accessories: I’ve seen nozzles and accessory packs being sold but I have no idea what they’re for. Can I print upgrades? Also what the heck does the Combo printer add-on do?

Alternatives: I’m not married to the P2S. Feel free to suggest alternatives. Thanks!

2


Hey everyone,

Perhaps I'm just needing a nudge to get out of decision paralysis. I had a toolhead breakdown due to a hardware failure and decided to rebuild as a A4T V2 because why not? I wanted to upgrade from the old Afterburner anyway at some time so now might be perfect!

But now I have to choose ... Orbiter 2.5 and Sherpa Mini are the options supported from the get-go. But for either I found "for sure that one!" voices.

For the hotend l go with the rapido X.

Or do I even go with a different toolhead all together?

I can't simply print a stealthburner anyway because the backup printer I have available only has a print area of 115x115 so I couldn't make the front plate fit anyway. And I really don't feel like printing a new.

Any voice of reason, experience or opinion is very welcome - I literally just need to stop staring at websites and ... Decide.

3


Feel free to add links in the comments

Uncle Jesse https://youtu.be/EIgitsJ9n0U Made with layers https://youtu.be/y_8CPStxy7g Cnc kitchen https://youtu.be/V3X8Xe5W04g Clough42 https://youtu.be/N2hF4Bx8YAk

4


Caveat it's AI coded

It's much more than I put in the title but the video does a better job of explaining it. It's also an ad for a 3D scanner

5
Your favorite slicer (discuss.tchncs.de)


I have been a long time Prusaslicer user but lately I'm running into a limitation. Hole XY size compensation is a big missing feature which I have seen in Cura. Also Cura handles lithophanes really well.

I do not like the UI of Cura but do like the Prusaslicer one.

What slicer do you prefer?

6


I bought the assembled version of the Prusa core one+ (gen 2). Got through the setup and calibration until hitting a (literal) snag when attempting to calibrate the filament sensors.

The assembled printer is supposed to come with a bit of orange PLA filament already loaded, sticking out of the end near the spool holder. I can see the orange filament in the PTFE tube, but the bit that's supposed to stick out seems to have snapped off. Telling the printer to unload the filament doesn't do anything.

I'm coming from a BambuLab A1 Mini, so I'm very much in the printing side of the hobby and not the printer side of the hobby, and I get a bit lost when the first step seems to be to completely disassemble the business end of the printer.

7


I've posted previously to the saga, and I have some updates. My prints are getting better, but still have room to grow. Thus far I have:

  • Updated my printer's firmware from 2019 -> 2023 (latest) because pause commands (G4) was not being respected. That was an ordeal since it's only supported to be done on windows/mac...I nearly bricked it doing it on linux, then spun up a windows VM and got it done. Took 3 days.
  • Changed the orientation of the prints so the stem points down.
  • Lifted the print so everything prints on supports, about 1/16 inch

It's looking MUCH better, but I'm having a stringing issue which is preventing the keycap from installing. I think this is a much easier fix, and I have knobs to turn on this:

8


I have a somewhat interesting issue.

Recently I've installed the BTT SFS v2 filament sensor, which detects both if filament is present and if there is a jam or not. The jam detection works with an encoder that spins whenever filament is running through it.

Pressure advance however works by slowing down and speeding up extrusion based on motion of the nozzle to prevent bulging and oozing.

This however triggers false positives in the jam detection. Without pressure advance it works fine.

Does anyone have experience with this? Below is example code of my Klipper config related to the jam sensor. Raising the detection length from 2.88 to 10 did not solve it and I don't want to put excessive numbers there.

[filament_motion_sensor encoder_sensor]
switch_pin: i forgot lol
detection_length: 10
extruder: extruder
pause_on_runout: False
runout_gcode:
  PAUSE # [pause_resume] is required in printer.cfg
  M117 Filament encoder runout
#insert_gcode:
  #M117 Filament encoder inserted
9


I'm considering a new printer this winter. I'm looking to replace my trusted Prusa Mk3S. And I've whittled it down to 2.

First is the Qidi Q2. I've been eyeing Qidi printers for a couple of years now. I like the enclosure and the high temp printing ability. The heated chamber works well for engineering filaments by all accounts. And it comes with MET certified filtration system already installed. I would buy it without the Qidi box because my A1 Mini has taught me that I just don't do a ton of color prints much beyond some signage. And I'm unsure of just how much I would be using high temp filaments beyond PETG and ABS/ASA due to the costs.

The contender is the Elegoo Centauri Carbon 2. I like the price, even with their Canvas 4 color printing, it's still $100US cheaper than the Qidi. But it doesn't have a dedicated chamber heater or air filer system as standard installed either. Both can be worked around as dyi add-ons though with extra effort and money required.

While things like how much and what filaments I would use that require heated chambers and fancy air filters is something only I can decide, there is the matter of reliability and repair ability.

As someone who had to design and build machines and then often needing to be the one that has to fix things when it all goes bad, I value reliability and repairability very highly.

So which printer can be relied upon to just work and is easiest to maintain and repair when needed in your opinion. How is manufacturer support? Is the Carbon 2 really as quiet as advertised?

10


I'm printing some trays that are thin on the bottom maybe 2mm. Not enough for there to be infill. I'm having the same issue on two completely different printers with different filament and different files. I'm using the same Orca profile for both of them though so it has to be a setting, maybe bed temperature? The sides of the trays are perfect.

11


I've designed a new toolhead a while ago and the hotend, a Phaetus Rapido UHF v2, is mounted using a small aluminum bracket meant for an E3D hotend.

The bracket is mounted to the toolhead using brass insert nuts that were pressed into the plastic using a soldering iron.

The picture is the side view of the toolhead. It's currently missing the bottom half.

The hotend ends up not entirety vertical.

How bad is this? Ideally it's perfectly vertical but is it worth the effort of straightening this out?

12


First, thanks for all the feedback and suggestions, I've been going through and looking for areas to tweak. I decided, in the interim, to print a bigger model to see if I can expose the issues more, and I think I accomplished that. This is the snail from Adventure Time, and I'm mostly very happy with this print; I could have added a tree support under the lower arm, but the detail is great and the layer lines are barely visible...until you get to the raised hand a bit, and to the eye stalks. Looking at what's going on, it looks pretty clear the layers are NOT getting enough time to cool and harden before the next starts.

I thought I had that accounted for with the following settings, but as far as I can tell, these settings are not being respected:

I would expect the printer to slow down a bit to its minimum, then when the minimum layer time is reached, it would go off to the side...but I think instead it's hovering close to the print and not giving it space to cool down.

I don't really want to switch slicers, but I am wondering if there's some Cura tip to uncover what I'm doing wrong here; I've read a ton but I am just not understanding how to get the printer to take its time on these tiny objects.

Here is a video of it printing, it's clearly not respecting the minimum layer time: https://photos.app.goo.gl/nhE7LjvDH9avutxd7

13


Hey! I noticed big prints have a somewhat imperfect look between layers, is this normal? My printer is a Qidi Q2C that I used for about 1000 hours. No maintenance has ever been done. Should I add some grease? Retention the strings?

14
strange top layer (lemmy.today)
submitted 3 weeks ago by to c/3dprinting@lemmy.world


Hi,

I've just swapped to a new PLA (Sunlu wood filled) and I'm getting strange lines in my top layer.

It is like some areas are just not being extruded at all.

Any ideas how I go about finding the cause of this?

15


A friend of a friend makes some useful equipment, and after ordering one of their items, I realized I have some concerns.

  1. This is a tool that will be breathed through (like a short tube, just for regular air) and PLA microplastics are microplastics. I assume coating with a food-safe craft resin should minimize the risk of deterioration or leaching of any additives/dyes if the filament isn't food-safe. Let me know if that assumption has problems.

  2. Ideally, the appearance would be midnight black and highly glossy, at least from a metre away. That said, I don't want to sand it because I don't have access to a workspace, I don't feel comfortable releasing microplastic debris into the air or water just for a small tool, I'm not contaminating my living space with it, and a respirator is an additional cost for a small, one-time project. Will glossy resin alone give a decently smooth appearance on top of unsanded 0.15mm?

16


I'm a bit stumped, and am looking for advice. I have an extremely old (Circa 2015) Craftbot Plus. It's hardly any parts of the original unit, kept alive with custom parts out of just spite. I use cura as my slicer, and it works fine for my needs. Recently, my kids have wanted to print custom keycaps. This is a difficult FDM print to begin with, and my old hardware isn't doing me any favors; it might be impossible. That being said, my prints turn out good, except for the tiny details in the actual stem. The picture is attached of various settings; I've tried a ton of stuff. I can share a cura profile, but the gist is I'm printing in PLA and have experimented with 195-210 degrees, .1mm layer height, line widths between .175-.2mm, various speeds, minimum speed and minimum layer duration, I've disabled ironing, and I've played with retraction. I'm kind of stumped, and am wondering if anyone has things I should try.

17


Heyo.

It's that time again: Time to crow about modeling something which took mere moments to knock together and if we're lucky as many as four other people on Earth might care about. That's the Very Specific Object way.

The other day I found myself with two problems. The first was that I wanted to sharpen some of my rather famously thick slabs of steel, and the other is that I am, as ever, lazy. I have a Ruixin RX-009 sharpening jig and I'm quite pleased with it, but its major shortcoming is that it can't clamp any knife thicker than 4mm. (This whole thing is just completely on brand for me, by the way. Top to bottom.)

The stock clamps in this jig are single aluminum part which I'm pretty sure is cast. This should be a doddle to recreate in plastic, so I did. And surprisingly, it works great.

It requires a couple of commodity metric screws and nuts, but that's to be expected. Otherwise, it works just like the original clamps. Only... thicker.

Printables link: https://www.printables.com/model/1876370-thick-clamp-for-ruixin-rx-009-and-friends

If you have a use for this, knock yourself out.

18


Might be a stupid question but there a very little information on sovol.eu, have anyone bought from there and is it a good seller?

https://sovol.eu/products/sovol-sv08-3d-printer

I am looking into buying a sovol sv08 and they are sold there pretty cheap.

Thanks in advance

19


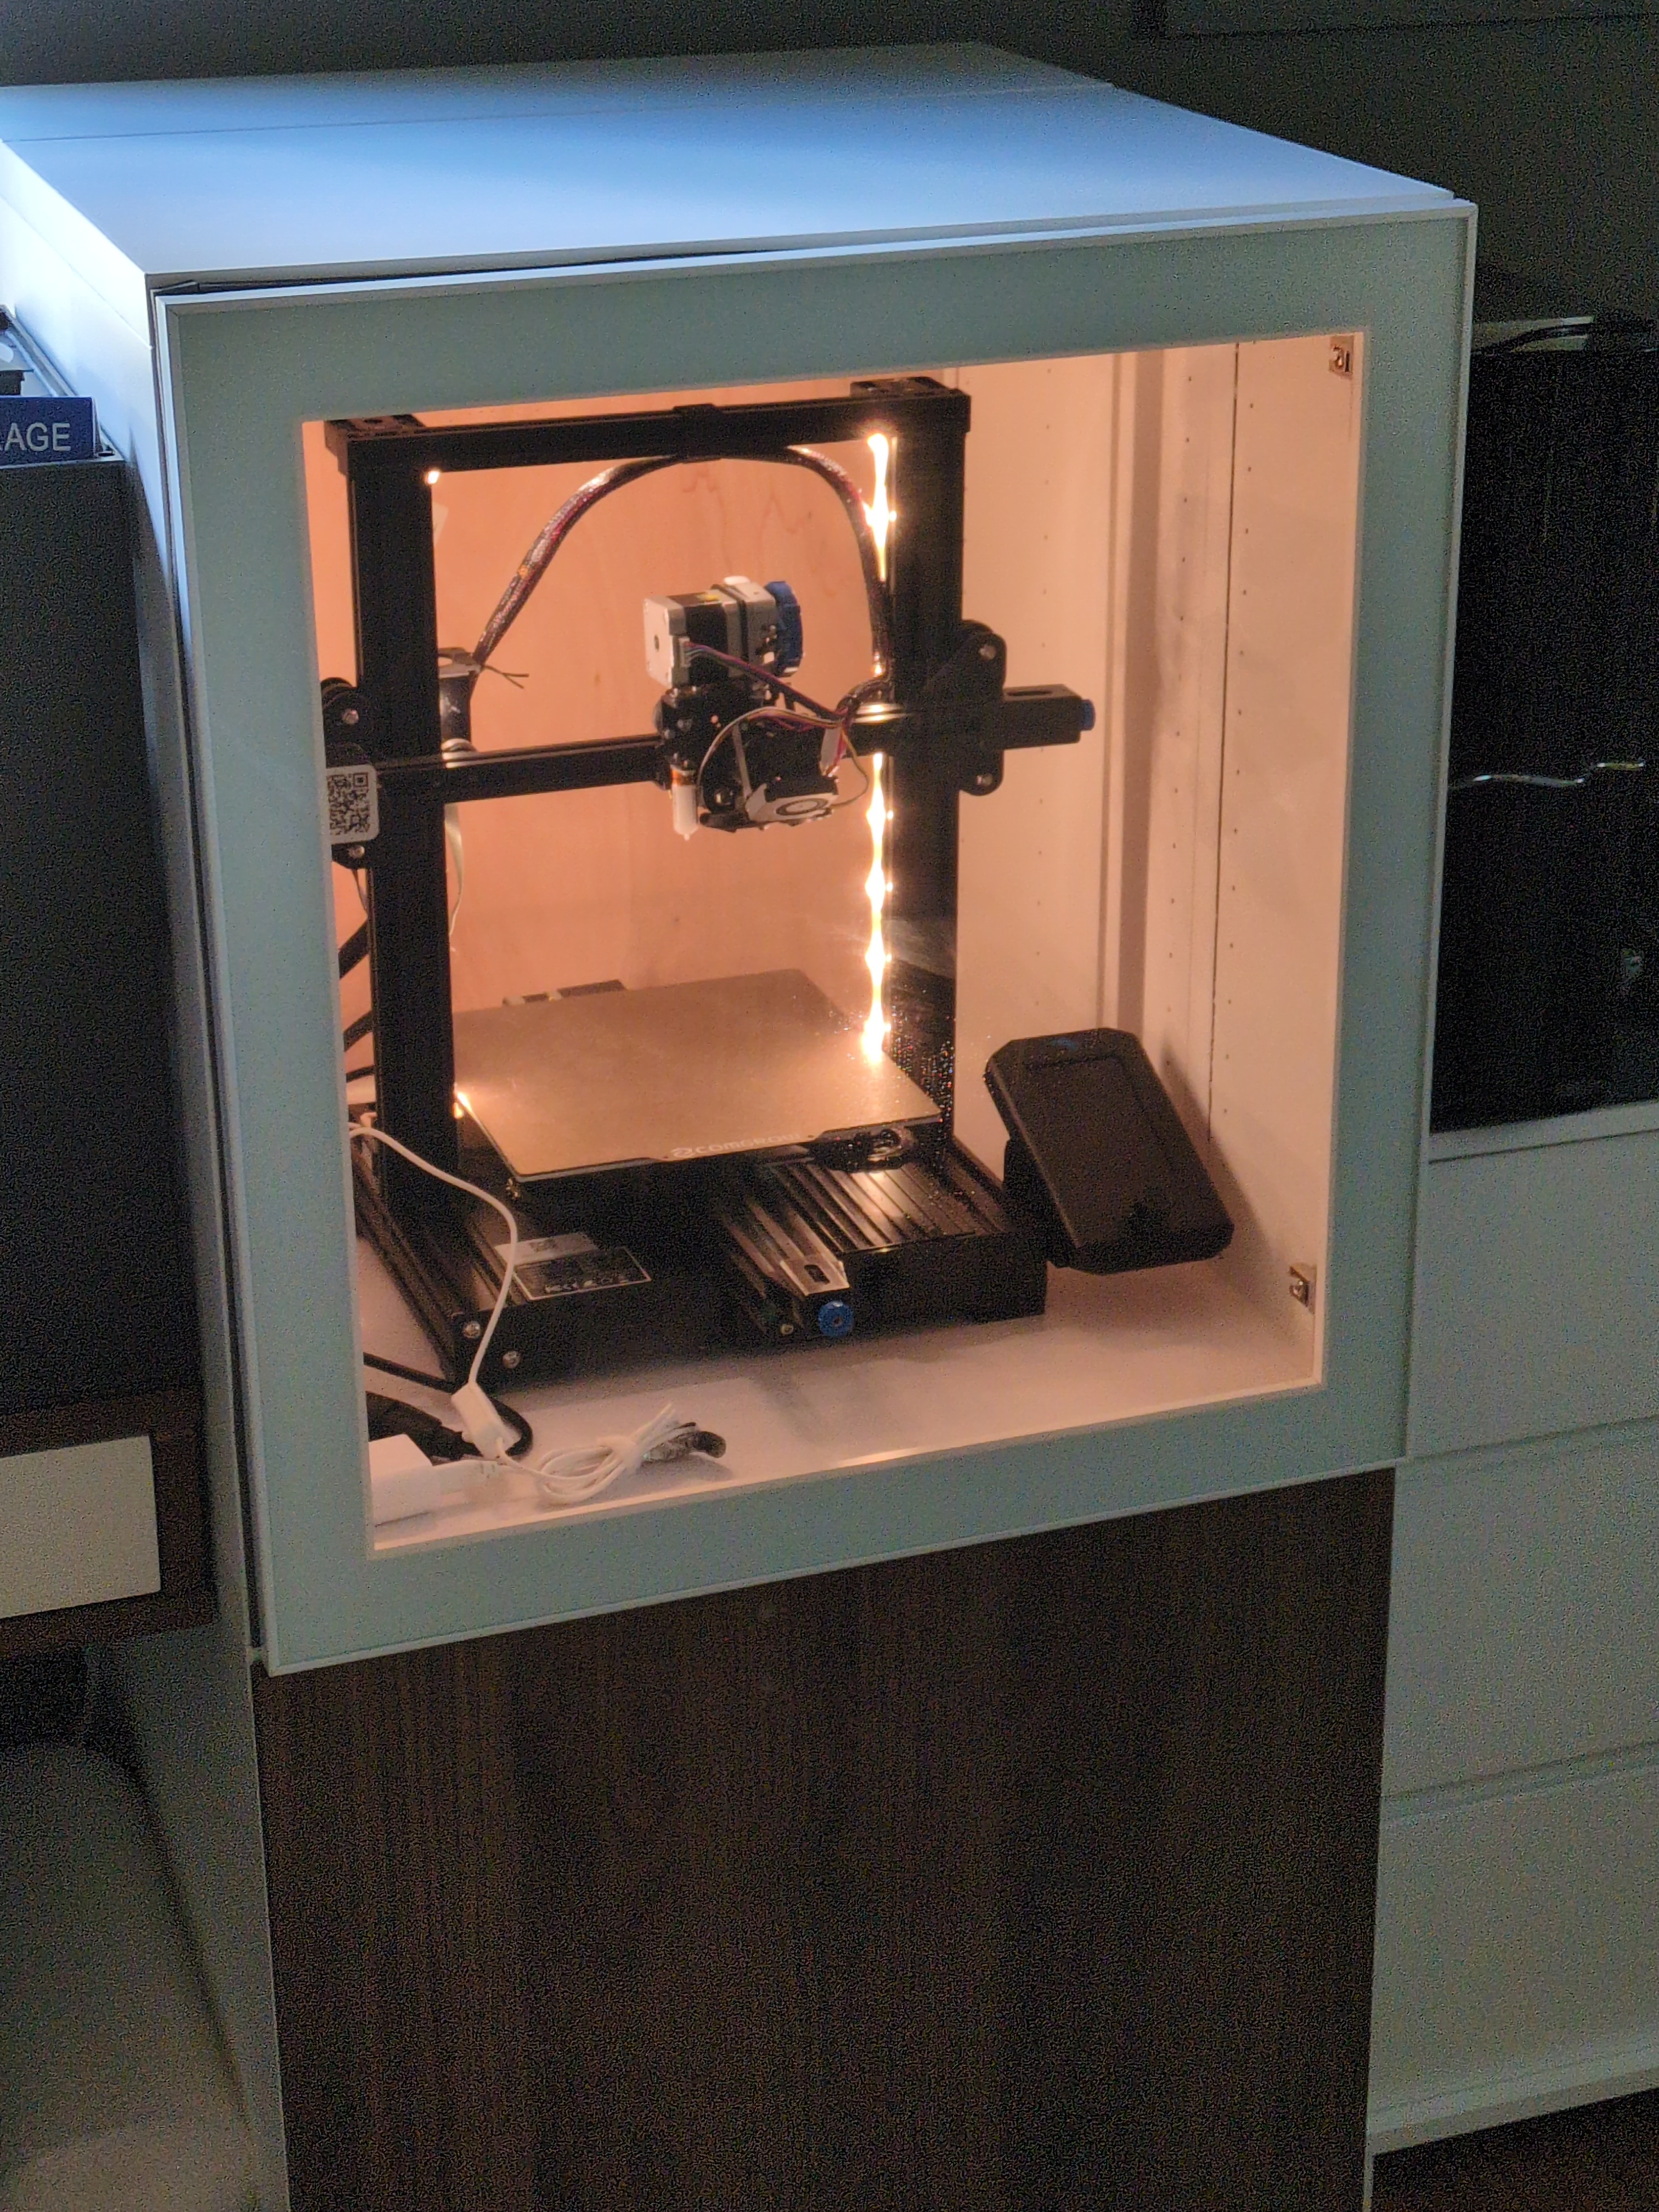
Finally built myself a nice 3D printer enclosure from IKEA cabinets.

Basic idea is to take a shallow (20cm) and a deep (40cm) cabinet frames and to stagger the bottom/top panels and wall panels, making a nice single-piece 60cm cube. A bit more info with a short how-to and a few ideas and nuances.

20


Hey everyone My sister wants to get into 3D printing. She has her birthday soon and we are thinking of gifting here a printer. What models wold you recommend?

What do you think of Bambu Lab X2D. What would you get for a beginer?

Edit: thank you all for the responses. I certainly did not expect so much engagement and such high quality answers. Will have a look at all the options you recommended. Hopefully our budget has enough room for a comparable morally righ choice.

21


Anyone have any advice with nylon aka polyamide and sticking to the bed plate? I've got an h2d (enclosed, heated) and printing without part cooling. The bed is pei with glue stick. The part is a rectangle that's 2x as long as it is wide. It warps no matter the bed adhesion tricks I use.

22


Printables link. Apologies for the... very lazy select + background blur. In the land of windows I would have used paint.net, but I'm coming to you from a mac today and haven't found a great alternative.

23


Shortly after I posted about my weird first layer issue the z axis motor failed completely. It is an oddball cheap motor and I could not find a direct replacement. The screw was also a very small diameter piece of all thread. I replaced the motor with a standard nema motor with a printed bracket. I did have to do some surgery with a Dremel and drill in order to get the new nut mounted to the carrier. I also had to change the steps per mm in firmware for the new screw. I haven't changed any of the slicer settings just different filament which is stringing pretty badly and I think the printer is going a bit fast. Other than that it's running pretty good.

24
25


San Diego County jumped into California’s sprawling ghost gun fight this week, suing a 3-D printing filament manufacturer it says hocks material for homespun firearms in violation of state law.

Working with the Giffords Law Center, the county counsel sued manufacturer Polymaker, alleging the company made a “strategic business choice” to market and sell 3-D printer filament to Californians for the express purpose of building illegal weapons. The polymer filament is sold in spools that feed into 3-D printers, allowing the devices to form designs created by their owners.

view more: next ›