1
posts
2
Just wanted to share that you need neither a big space nor expensive setups.

3
Hey guys.. I put my food hyperfixation on growing some hydroponic plants in my livingroom for a couple of weeks and most of the experminents are thriving, which is absolutely amazing. One of the experiments is growing salad in old eine bottles. I printed some fitting cups for the bottles, raised some seedlings and out them in rockwoolinto the netcups. It kinda works but waterlevel is dropping faster than the roots are developing and I need to fill uo some water/nutrients every couple of days.
Is there anything I am doing wrong or that I can optimize to help them develop the roots faster? How big should the roots already been to put them in the bottle? Maxbe it eas just to early?

4
5
6
7
Coco coir has become a staple on my balcony. I seriously have to thank like 90% of my harvests in total to that awesome inert growing medium!
A few years ago, I hated this stuff. All plants I put in there died and it got stanky really quick. Fail.
Then, I figured out that these cheap bricks have a lot of junk in there that needs to be flushed out. In particular, high amounts of sodium (nearby sea water), which can be toxic even in small amounts for plants.
But also, there's one even bigger threat: cation exchange. Coco coir wants ALL the calcium and magnesium it can find. So it steals it from your plant.
Even worse is, that it gives off LOTS of potassium (and sodium) in exchange, completely massacring the plant.
BONUS: The roots will suffocate too. Coir absorbs water TOO well.
Despite learning all of that, I found it to be the most versatile, cheap, and easy growing medium ever. It just needs a few steps of preparation.
Preparing the buffering solution
Create a double strength nutrient solution, containing calcium and magnesium. You could use only CalMag too if you have it around.

I also added some silicate.
Dissolve 10 l in a bucket.
Brick
Enclose the coco coir brick in a washing bag for bras. The ones with a zip tie.
And throw it into the bucket.

It will expand to 10 l in the next minutes, soaking up most of the solution.

The EC climbed to 6 mS! More than the nutrient solution provided.
Now, let it soak over night. And knead it like bread dough a few times if you want 🙂

Add some perlite
Drain it by lifting the bag out. Add 1 l (10% by volume).

Flush
Press out the bag and add 10 l of osmosis or rain water.
Let it soak a few hours, moving it sometimes.
Measure the EC.
Repeat.
500 mS in the second flush. Would be good enough for growing big crops like chili or weed.

I, however, want the good stuff. Seedlings could develop badly for example.
It also still looks filthy, and these microparticles allow less aeration.


Third flush.

This is great now. I use it on sensitive seedlings without issues.
Dry it
Place the bag somewhere outside to dry. Some rain showers on top are great. But it should be dry in a few days when hot.

Result
Coco can hold immense amounts of water.
If you now add between 10-30% perlite it can even stand in nutrient solution for days without root rot, while still holding to moisture.

The now "modified" media is now almost completely inert (no more nutrient stealing issues) and pretty much can't decompose, even when constantly moist.
It's ultra cheap (1€/ brick for 15 l of substrate) and also sustainable, while being "disposable" at the same time. Even better when you mix it into your garden compost after hydro use for airy moisture retentive soil.
I fucking love this stuff!


8
9
I wanna share with you the so called "Kratky method", a hydroponic way of growing herbs, leafy greens and all sorts of stuff without any growing media.
I use glass bottles, which I made a nice 3D-printed adapter for. It fits an optional wick (useful for the start) and holds everything in place. You can even refill them later on!

Plant roots need both oxygen and water. If you only put them into a full glass of water, they'll die due to suffocation ("overwatering"/ root rot).
In the Kratky method, the level of the nutrient solution drops as the plant grows, and oxygen is provided that way.


I really like this method for growing lettuce on my balcony.
The main benefit, compared to a classic growing medium like coco coir (or even soil), is that you don't even need any growing media you have to dispose of later on. Zero waste.
And of course all those neat other hydro benefits, like fast growth, less pests, and so on.


10
11
12
Not sure if this is strictly hydroponics but my fishtank loves the plants and the plants love the tank.
I have quite a lot of filtration but the plants absorb the nitrate that I otherwise would have to do more waterchanges to remove.
In the tank I have fancy goldfish who really do produce a lot of ammonia
Also a short video

13
This is my test pothos. I completely neglected it for one year with LECA as substrate for semi-hydro in a small 1,5 l pot.
All my other established (house-)plants get "flushed" once every few months, around once a quarter. I basically just discard the few hundred millilitres of nutrient solution and refill the pot again from the top.
Some people say you need to
- Really flush it. Run the shower through it or whatever, and
- Do that once every two weeks.
I call that total BS, at least in my experience and with my conditions.
I only do this on new plants where old soil roots and dirt are rotting and need to get out.
I took EC and pH measurements from time to time, and never saw much changing. No increase in EC (incoming nutrient burn), nor decrease (incoming deficiencies), nor pH changes.
I use Masterblend as fertilizer, with the recommended concentration for blooming stage, and reverse osmosis filtered or rain water.
The top layer of the LECA is pretty much always dry, and I didn't see much of a fertilizer crust because of this.
I also gifted a Calathea-type plant (sensitive to minerals) to a family member. She uses a long term fertiliser and tap water most of the time. There is a mineral crust on top, but the plant looks okay. She also rarely flushes. Works fine too.
When I repotted today, everything looked fine on said pothos.


All of this tells me S/H seems to be even less work than people say, which means a lot, because it already is super low maintenance!
Still, one of the big pros of LECA is that you can flush it, and you definitely should from time to time.
If you use a high quality fertiliser (one that also includes trace elements and Mg/Ca) you probably don't need to expect much nutrient issues if you use RO water.
If you use tap water then flush it a bit more often to prevent nutrient lockout due to limestone buildup.
But there's a lot of disgusting stuff building up over time, like plant exudates or dead roots.
I will continue to flush only from time to time, because it keeps everything hygienic and fresh.

14
Using lechuza citrus pon as a substrate as I've heard that citrus doesn't take to LECA well. Wicking up nutrient solution from the reservoir which is being kept fresh by an air stone.
I moved it to this setup from soil because I'm bad about checking for soil moistness, and it lost most of its leaves. But I can refresh the water every week or two in a reservoir no problem.
This picture is a week old and since then there's been even more new leaf growth.

15
It's the first time I own a dryer.
When I poured out the water it has collected (a few liters per run) I quickly tested the EC and pH and found out, that it is almost identical to the one made by my reverse osmosis filter!
No wonder, since the dryer is basically just a big distillation machine.
Thats super neat. It will save me a lot of work filtering tap water.
I will collect it from now on and use it for watering my plants.
Why does it matter?
Plants really don't like tap water. Even in a country like mine, where no chlorine/ fluoride/ whatever is added, the dissolved minerals cause trouble. They will build up over time and make nutrients unavailable, even if you adjust the pH.
The buildup and nutrient lockout will harm the plants a lot in the long term, and you will have way more trouble checking and correcting EC and pH.

16
17
I've tried and compared many different types and brands of LECA. Here's what I've learnt [Guide]
(slrpnk.net)
LECA (hydro clay balls, my media of choice) isn't LECA. There are many different brands and types around on the market.
TL;DR: The best brand is...
It doesn't matter! Just use the cheapest one you can find. I made an overview about the different types at the end.
Here are the properties that matter tho:
- Size:
- Small balls have a stronger capillary action. They pull up the nutrient solution stronger, which results in a wetter medium, and sometimes more salt buildup at the top.
- There's less space between the balls the smaller they are.
This results in less airflow, but more contact area for the roots.
For bigger plants and epiphytes (Orchids, monstera, etc.) you might prefer bigger clumps, and for stuff like ferns or small pots in general smaller beads are better.
- Shape:
- Irregular shaped beads anchor the roots better
- Rounder ones have more airflow and are easier to sift
- When you spill some, the round balls will roll all over your apartment, while the irregular shaped ones stay more in place. Easier to clean up ;)
- Reusing: speaking of cleaning up, rounder balls will be easier to remove the roots. But, I just throw them into the pressure cooker, and the roots turn into mush and remove themselves.
- Porousity/ Density:
- They are all working fine, doesn't matter much
- Some will float forever, some will sink to the bottom when submerged
- Some types crack in the oven and explode when cleaning for reuse. You'll have to be careful and increase the temperature slowly to burn off plant matter. That step usually isn't needed tho.
How can you tell if a brand is high quality or not?
- Size variation:
A good product has beads that are uniformly sized. If there are a lot of small balls, they fill the gaps and worsen the aeration.
- Amount of "junk" in there:
I've had some bags where I found some wood chips, plastic stuff and unpopped kernels/ pieces of clay in there.
They usually aren't a huge problem, but still kinda annoying.
And that's it!
Overview and pictures
Overview

I live in Germany, so many of the brands probably aren't available to you. That doesn't matter tho, since the "type" matters more than the brand.
A
I got this one from Dehner, a local garden store.
- Expensive
- Good median size distribution, very round shaped and smooth surface.
- Doesn't float


B
- Cheap
- I got this from Action, a local dollarstore
- Very bad size distribution. Lots of very small beads.
- Dense
- Uniformly round


C
Brand: Floragard
- Cheapest, from Amazon
- Irregular shaped, rough surface
- Good size distribution, but some are very big
- Floats, very light
- Explodes in oven
- Still one of my favourites


D
- Also from Dehner
- Very uniform size distribution, but very small
- Very dense


E


18
These cucumbers seem to love the Kratky setup I put them in. I also started Kratky buckets with Tomatoes and Romaine lettuce.

19
A while ago, another member of this community posted a study on how old used fabrics can be utilised to grow hydroponic plants.
The fabric should be made of synthetic fibers if you want to keep it for longer than a few days.
On the main picture I'm growing cress on a "single use" cotton cloth I use to wipe my glasses dry, so it's basically clean, but has some lint or whatever on it and would otherwise land in the trash after some uses.
It will decay after a few weeks, but since the cress (or other microgreens) will be eaten in a matter of days, that won't happen ;)
I also created a "buffet" for my cats, consisting of different cat grass types and catnip.
I have to replace them quite often, especially the wheat, because they get nasty really quickly, but I don't want to waste any substrate, like LECA, coco coir or even soil for that matter.
For that, I've cut my old polyester sports shirt into segments and stapled them onto nursery pots, just long enough that they're reaching into the nutrient solution.


The textile will act as a wick and keep the surface and interior constantly moist, while most of the roots will either grow directly through the fabric, like in the kratky method, and some will grow sidewards.
The great thing is that it won't create any waste, and is basically free. I can just throw it away after use, or maybe even reuse it again, let's see!
Sprinkling the tiny seeds was also extremely easy, and I can keep it small enough to be modular.

20
21
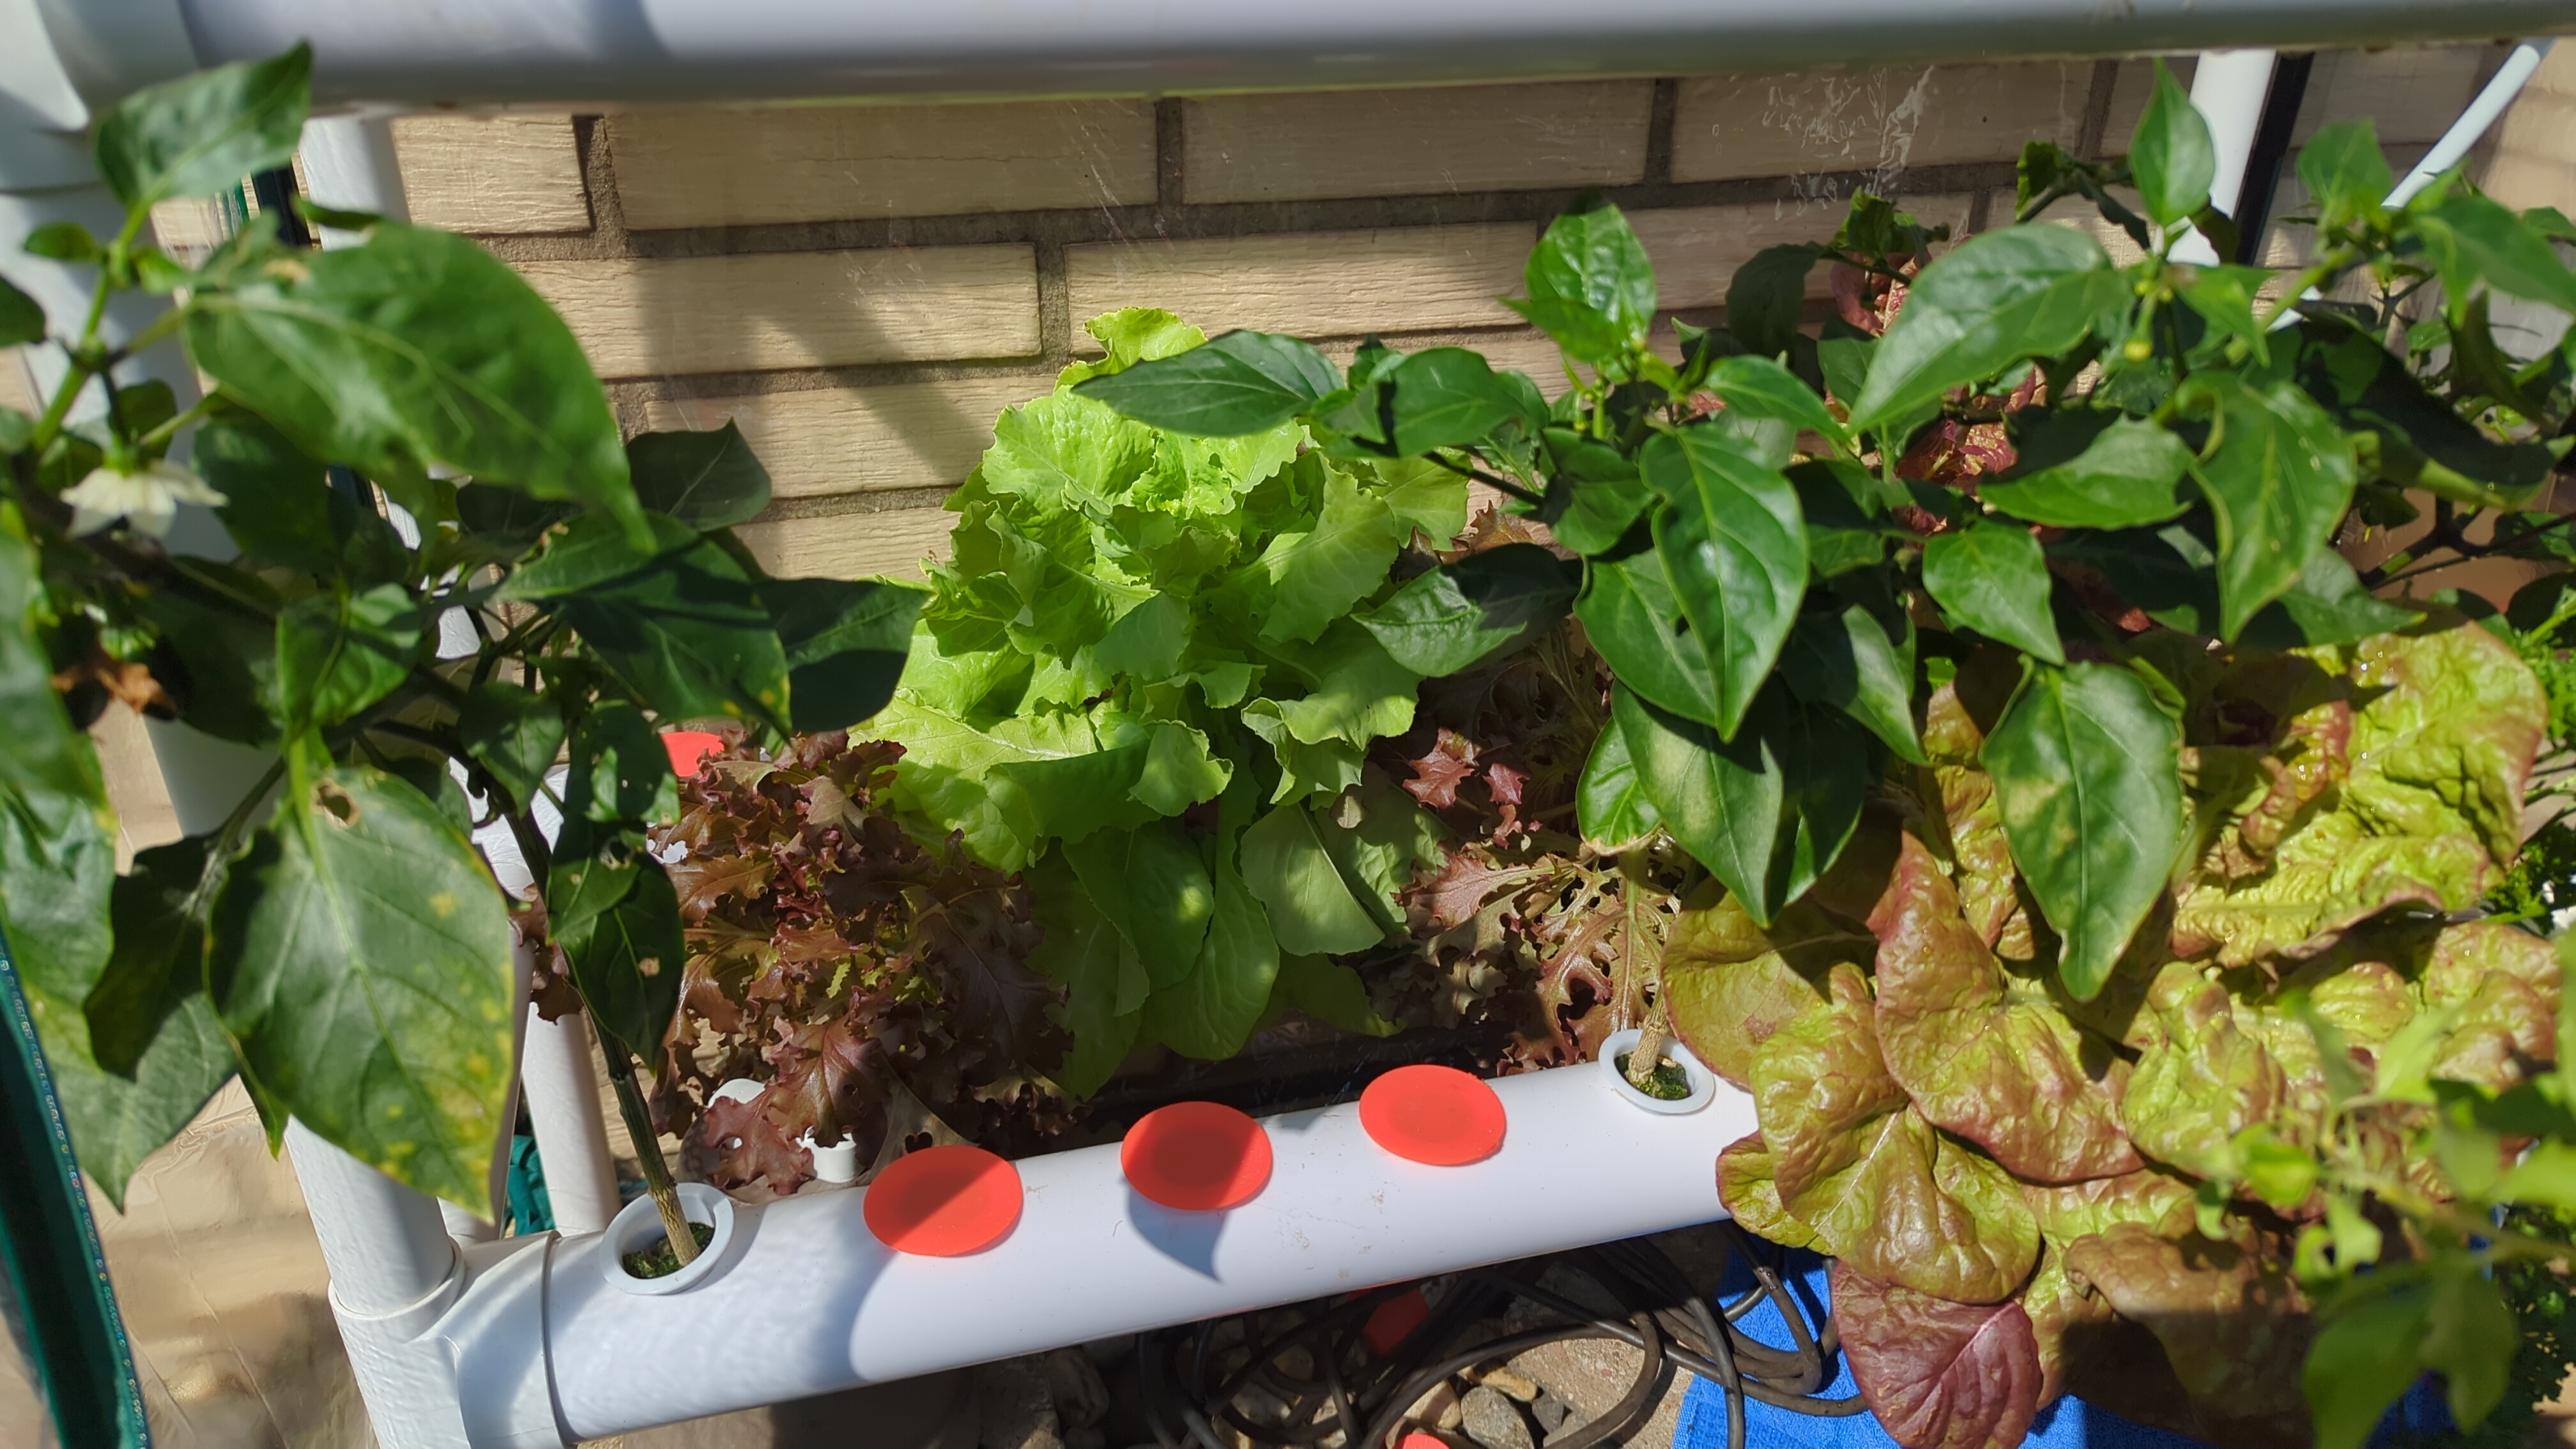
So i finished the Salad, and pulled out a couple roots


Thats from the top front row, wormbox or compost would probably a good idea. Any recommendations instead of trash?
Couple extra Pics of the Outdoor Hydro with a bit of fixing rain collection on roof


 Any Ideas on a more permanent fix for the tent? 3Dprinting Clips and adding a middel beam...
22
Quick disclaimer: I already made a more beginner friendly guide on !gruenerdaumen@feddit.org in German, which was more written for people who never came into contact with hydro. Here it is if you're interested meine deutschen Freunde :)
This guide only covers the technique itself, and is not about hydroponics in general.
Introduction
Have you ever wondered, if it's possible to create the perfect environment for every plant out there?
I did too, and now I can tell you, it's possible!
I have about 70+ houseplants alone sitting in semi-hydro (S/H), including orchids, ferns, cacti, calatheas, and whatnot. And they are all thriving!
Even with (comparably) very low maintainence!
Upkeeping this jungle would be impossible otherwise.
And these are only my indoor houseplants. It also works on other (outdoor) crops, like cannabis, chilis, herbs, and more!
How it works
To demonstrate you this setup, let me show you my small calathea. It has a nice clear pot, where you can see all parts the best, including the roots.


The backbone of this setup is the substrate. For that, I use expanded clay balls, also called "LECA" or "hydroton".
It has the ability to be wicking, can store a bit of moisture, and, most importantly, it has many air gaps in between the pellets due to the form factor.
There's also the additional benefit that it's inert and it also will never decay, so you don't have to repot as often. Oh, and it's also very affordable :)
The pot is always standing ~1/3rd in nutrient solution. To ensure that, a water level indicator is added. That way, you will never have to guess again when to water!
If you plan to go on vacation, you can fill the pot up to the maximum line, and that will last you for weeks!
Don't use the full capacity too often tho, as it will create problems further down the road and should only be used as exception.
With a regular sized plant in a regular sized pot, I only have to water once a week, often only even once every two weeks when filled to the middle ("optimum") line.
Now, the magic begins. The plant will now begin to regulate itself and takes what it needs as it grows. How you may ask?
Because there is a gradient of different moisture zones in the pot.
The bottom third is 100% wet, and 0% air. When the plant is thirsty, it will form water roots that reach directly into the nutrient solution.
The middle half is balanced. Here, the LECA wicks up most of the moisture, and the balls are fully saturated and moist. The substrate can only store 30% of its weight in water, and the rest is air, even on the inside! The moisture is mainly upheld by capillary action.
And the upper few centimeters are (almost) completely dry. They will mostly act as a cover, so the moisture doesn't draw up too high.
(Btw, this is one of the reasons why we don't wanna fill up the reservoir too much, since that would shift the zones up too high and create a toxic fertilizer crust on the surface that can burn the plant when done in excess.)
You can see this phenomenon on said calathea.

The bottom roots look completely different than the upper ones.
Especially the upper roots have formed lots of root hair, which are often also called "air roots", while most of the other roots have established themselfes just right above where the nutrient solution surface is usually, and a few ones are submerged into the solution.
I never placed them myself that way, the plant did it itself! It just took what it needed.
Some moisture loving plants (like banana trees, calatheas, etc.) reach down almost completely into the reservoir, while others, like phalaenopsis orchids for example, can't stand having wet feet at all and establish themselves in the upper sections.
How amazing is that?!
Drawbacks (& care routine)
There aren't many, but still, there are a few ones.
First, transitioning plants from soil/ other setups to S/H is painful.
It will suffer a lot, and so will you.
If there's one single crumb of dirt left, it will rot. And some roots will rot anyway, no matter what you do. If you want tips, ask me.
Also, you'll need to "flush" the pot regularly. If you see the water level approaching "minimum", just swish the pot around a bit, that will loosen up debris. Then pour that in the drain, and top water it with your nutrient solution.
That will flush any accumulated salts and waste material down into the reservoir, and you can dispose it the next time.
I personally think doing that at least every second or third time when watering (basically, once a month) works the best. You don't need to overthink it.
Anyway, this post is already longer than expected. If you have any questions, ask. I know everything about that topic :D
Bonus (& tips)
Here are some random pictures with information for you! :)
These are commercial hydro pots. I can highly recommend buying those, instead of going the DIY-route.


If you still wanna build one yourself, because those inner hydro pots often don't fit into normal outer plant pots, I strongly recommend you to use orchid pots instead of nursery pots. They have way better airflow and you can see the roots better.
Also, zip-tie the indicator to the pot for easier lifting :)
Here are the roots of two different plants. See how different they look!


I've noticed that some (peat loving) carnivorous plants don't like hydro, while others still thrive in it


Here's me growing potatoes and weed


And here are a few of my calatheas (or similar)


Some of them have a few crispy tips, either due to the initial transition from soil to hydro, or because I completely forgot to water them. Never ever let your reservoir run dry! This can severely damage the delicate root structure!
Most of them are less than half a year old, and they even grew so much in winter that I was able to divide the root stock and propagate them!
Now, summer is starting, and they just explode with growth! It feels like they almost push out leafes daily and look incredible vibrant!
23
I feel a little bit dumb right now, because I bought almost 200 liters of LECA this year for my balcony, just to find out that half of that may have worked out just as well...
The video covers growing root vegetables (potatoes, ginger, etc.) in particular, because they seem to not grow that well in substrate-less techniques like the suspended pot method.
Substrate is expensive, and you can cut a lot of it out by just using a cache pot or whatever inside the actual pot, and they don't seem to mind at all about that!


24
25
What would be the best "substrate" for these Kratky bottle plugs to hold seeds or cuttings in place?
(slrpnk.net)
I designed and printed these adapters, which fit into used glass bottles. I use them to grow lettuce, basil, and more.
I will publish the files very soon and also make a post about them :)
Right now, I'm trying different materials to use as substrate for holding the seeds, but most I tried sucked in one way or another.
- LECA is too coarse, and the balls roll out.
- Coco coir is washed out quickly when filling the bottles/ when raining, and rots in the nutrient solution
- Polyester filling (used for pillows) is either completely soaked, or bone dry, but works reasonably well
- PVA sponges become too hard when dry
- Cotton/ other cellulose stuff (towel, etc.) decompose too quickly
Can you suggest me other materials that would be best suited for that purpose?


view more:
next ›