1


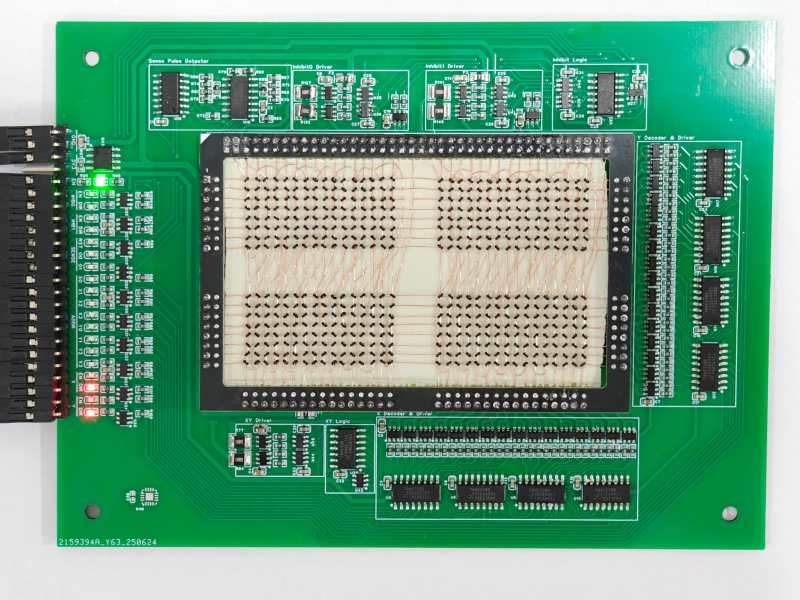
Magnetic Core memory was the RAM at the heart of many computer systems through the 1970s, and is undergoing something of a resurgence today since it is easiest form of memory for an enterprising hacker to DIY. [Han] has an excellent writeup that goes deep in the best-practices of how to wire up core memory, that pairs with his 512-bit MagneticCoreMemoryController on GitHub.

Magnetic core memory works by storing data inside the magnetic flux of a ferrite ‘core’. Magnetize it in one direction, you have a 1; the other is a 0. Sensing is current-based, and erases the existing value, requiring a read-rewrite circuit. You want the gory details? Check out [Han]’s writeup; he explains it better than we can, complete with how to wire the ferrites and oscilloscope traces to explain why you want to wiring them that way. It may be the most complete design brief to be written about magnetic core memory to be written this decade.

This little memory pack [Han] built with this information is rock-solid: it ran for 24 hours straight, undergoing multiple continuous memory tests — a total of several gigabytes of information, with zero errors. That was always the strength of ferrite memory, though, along with the fact you can lose power and keep your data. In in the retrocomputer world, 512 bits doesn’t seem like much, but it’s enough to play with. We’ve even featured smaller magnetic core modules, like the Core 64. (No prize if you guess how many bits that is.) One could be excused for considering them toys; in the old days, you’d have had cabinets full of these sorts of hand-wound memory cards.

Magnetic core memory should not be confused with core-rope memory, which was a ROM solution of similar vintage. The legendary Apollo Guidance Computer used both.

We’d love to see a hack that makes real use of these pre-modern memory modality– if you know of one, send in a tip.


From Blog – Hackaday via this RSS feed

2


Immutable distributions are slowly spreading across the Linux world– but should you care? Are they hacker friendly? What does “immutable” mean, anyway?

Immutable means “not subject or susceptible to change” according to Merriam-Webster, which is not 100% accurate in this context, but it’s close enough and the name is there so we’re stuck with it. Immutable distributions are subject to change, it’s just that how you change them is quite a bit different than bog-standard Linux. Will this matter to you? Read on to find out! (Or, if you know the answers already, read on to find out how angry you should be in the comments section.)

Immutability is cloud-based thinking: the system has a known-good state, and it’s always in it. Everything that is not part of the core system is containerized and controlled. I’m writing this from a KDE-based distribution called Aurora, part of the Universal Blue project that builds on Fedora’s Atomic Desktop work. It bills itself as being for “lazy developers”.

The advantage to this hypothetical lazy dev is that the base system is already built, and you can’t get distracted messing around with it. It works, and it isn’t at all likely to break. Every installation is essentially identical to every other installation, which means reproducibility is all but guaranteed. No more faffing about arguing on forums to figure out which library is conflicting with which. In an immutable system, they’ve all been selected to play well together, and anything else is safely containerized. (Again, a cloud ideal.) If the devs make a mistake during an update, well, just roll back! 

50 Shades of Immunability

The different flavours of immutable linux differ in how they accomplish that, but all have rollbacks as a basic capability. Each change to the system becomes a new, indivisible image; that’s why we talk about atomic updates. You create a new system image when you update, but you don’t start using it until you reboot the system. (This has some advantages to stability, as you might imagine, although the rebooting can get old.) The old image is maintained on your system, just in case you happen to need it.

MicroOS and its descendants (like Aeon) use a system based on BRTFS snapshots to provide rollbacks. Fedora’s atomic desktops, like Silverblue, and the Universal Blue downstreams that are based on Fedora like Bazzite or Aurora use a system called OSTree, which is considerably more complex and more interesting. You can do something similar with Nix, of course, but that is a whole other kettle of fish.

OSTree bills itself as “Git for operating system binaries”. Every update, or every package installed is layered onto the tree and can be rolled back if needed– en masse, or individually. You can package up that tree of commits, and deploy it onto a new system, making devising new “distros” so trivial they don’t really deserve the name. In theory, you can install everything via OSTree, but the further you take your system from the base image, the less you have that “every system is identical” easy-problem-solving that the immutable guys like to talk about. 

Of course you do want to install applications, and you do it the same way you might on a server: in containers. What sort of containers can vary by taste, but typically that means Flatpak for GUI applications. Fedora-based immutable distributions like Silverblue or Aurora use Flatpak, as does OpenSuse. (AppImage and snap are also options, technically speaking, but who likes snaps?) The Universal Blue team adds in Homebrew for those terminal applications that don’t tend to get Flatpaks. I admit that I was surprised at first to see Homebrew when I started using Aurora, since I knew it as “the missing package manager for MacOS” but its inclusion makes perfect sense when you think about it. 

MacOS is the First Immutable UNIX

MacOS, you see, is the first immutable UNIX. As much as we in the Linux community don’t like to talk about it, Macs aren’t just POSIX compatible– they run Certified UNIX(™). And Curputino has been moving towards this “immutable” thing for a long time, until Catalina finally sealed the system folders away completely on a read-only volume. Updates for MacOS also come as snapshots to replace that system volume– you could certainly call them “atomic”. Since the system volume is locked down, traditional package managers won’t be able operate. Homebrew was created to solve that problem. It works just as well on a Linux system that has the same lockdown applied to its system folders.

If Homebrew isn’t your cup of tea – and it seems to not be everyone’s, since I think Universal Blue is the only distro set to ship with it – you can go more hard-core into containerization with docker or podman. Somewhere in between, you could use something like Distrobox. If you haven’t heard of it, Distrobox is a framework for deploying traditional linux systems inside containers. For devs, it’s great for testing, even if you aren’t basing it on top of an immutable distribution. If you’ve never worked in the cloud, this may all sound like rube-goldberg gobbbly-gook, (“linux in a box on my linux!?”) but once you adapt to it, it’s not so bad.

The Year of Immutable on the Desktop?

The question is: do you want to adapt to it? Is cloud-based thinking necessary on the desktop? Well I’d say it depends on who is using the desktop. I would absolutely steer Windows users who are thinking of switching to Linux in the wake of the Windows 10 EOL to a Universal Blue distribution, and probably Aurora since KDE is more windows-y than Gnome. Most of those ex-Windows users are people who just want to use a computer, not play with it. If that describes you, then maybe an immutable distribution could be to your liking.

MacOS has shown that very few desktop users will ever notice if they can access the system folders or not; they are most interested in having a stable, reproducible environment to work in. Thus, immutable Linux may be the way to bring Linux mainstream – certainly Steam thinks so, with SteamOS. For their use case, it’s hard to argue the benefits: you need a stable base system for the stack of cards that is gaming on Linux, and tech support is much simplified for a locked-down operating system that you cannot install packages on. The rising popularity of Bazzite, Universal Blue’s gaming-centric distribution, also speaks to this.

There are downsides to this kind of system, of course, and it is important to recognize that. Some people really, really hate containerization because Flatpaks, and other similar options, use more memory, both on disk and in RAM. Of course not everything is available as a Flatpak, or on Homebrew if the system uses that. If you want to use Toolbox or Distrobox to get a distro-specific set of packages, well, of course running a whole extra Linux system in a container is going to have overhead. 

From an aesthetic perspective, it’s not as elegant as a traditional Linux environment, at least to some eyes, mine included. Those of us who switched to Linux because we wanted absolute control over our computers might not feel too great about the “do not touch” label implicitly scrawled across the system folders, even if we do get something like rpm-ostree to make changes with. Even with a package manager, there are customizations and tweaks you simply cannot make on a read-only system.  For those of us who treat Linux as a hobby, that’s probably a no-go. 

For the “Lazy Developer” Aurora sells itself to, well, that’s perhaps a different story. Speaking of lazy, I’ve been using Aurora for a few months now, almost in spite of myself. I initially loaded it as the last step on a distro-hopping jaunt to see if I could find a good Windows 10 replacement for my parents. (I think this is it, to be honest.) It’s still on my main laptop simply because it’s so unobtrusively out of the way that I can think of no reason to install anything else.

At some point that may change, and when it does I might just overcorrect and do a Linux From Scratch build or try out like NixOS like I’ve been meaning to. Something like that would let me regain the sense of agency I have forfeited to the Universal Blue dev team while running Aurora. (There have been times where I can feel the ghostly hand of an imaginary sysadmin urging me not to mess with my own system.) 

After seeing how well containerization can work on desktop, Nix looks extra appealing – it can do most of what this article talks about with the immutable distros, but without trusting configuration of any facet of the system to anyone else. What do you think? Are the touted benefits to stability, reproducibility, and security worth the hassle of an immutable distribution? Is the grass greener in the land of Nix? If you’ve tried one of the immutable Linux distributions out there, we’d love to hear what you think in the comments.


From Blog – Hackaday via this RSS feed
3
Long Live RSS! (hackaday.com)
submitted 1 year ago by [B] to c/hackaday@rss.ponder.cat


A black and white illustration of people with headphones or microphones and floating empty speech bubbles. They appear happy and engaged with each other in a pleasant, park-like environment. In the foreground, on top of a wall, various anthropomorphized big tech logos like Apple, Amazon, and Google spy down on the people with binoculars like hunters assessing their prey. The text reads, "But like any good thing on the internet, there's a big tech monopoly trying to ruin it."

While we know that many of you are reading Hackaday via our Really Simple Syndication (RSS) feed, we suspect that most people on the street wouldn’t know that it underlies a lot of the modern internet. [A. McNamee] and [A. Service] have created an illustrated history of RSS that proudly proclaims RSS is (not) dead (yet)!

While tens of millions of users used Google Reader before it was shut down, social media and search companies have tried to squeeze independent blogs and websites for an increasingly large part of their revenue, making it more and more difficult to exist outside the walled gardens of Facebook, Apple, Google, etc. Despite those of you that remember, RSS has been mostly forgotten.

RSS has been the backbone of the podcast industry, however, quietly serving feeds to millions of users everywhere with few of them aware that an open protocol from the 90s was serving up their content. As with every other corner of the internet where money could be made, corporate raiders have come to scoop up creators and skim the profits for themselves. Spotify has been the most egregious actor here, but the usual suspects of Apple, Google, and Amazon are also making plays to enclose the podcast commons.

If you’d like to learn more about how big tech is sucking the life out of the internet (and possibly how to reverse the enshittification) check out Cory Doctorow’s keynote from our very own Supercon.


From Blog – Hackaday via this RSS feed

4


It should probably come as no surprise to anyone that the images which we look at every day – whether printed or on a display – are simply illusions. That cat picture isn’t actually a cat, but rather a collection of dots that when looked at from far enough away tricks our brain into thinking that we are indeed looking at a two-dimensional cat and happily fills in the blanks. These dots can use the full CMYK color model for prints, RGB(A) for digital images or a limited color space including greyscale.

Perhaps more interesting is the use of dithering to further trick the mind into seeing things that aren’t truly there by adding noise. Simply put, dithering is the process of adding noise to reduce quantization error, which in images shows up as artefacts like color banding. Within the field of digital audio dithering is also used, for similar reasons. Part of the process of going from an analog signal to a digital one involves throwing away data that falls outside the sampling rate and quantization depth.

By adding dithering noise these quantization errors are smoothed out, with the final effect depending on the dithering algorithm used.

The Digital Era

Plot of a quantized signal and its error. (Source: Wikimedia)Plot of a quantized signal and its error. (Source: Wikimedia)

For most of history, humanity’s methods of visual-auditory recording and reproduction were analog, starting with methods like drawing and painting. Until fairly recently reproducing music required you to assemble skilled artists, until the arrival of analog recording and playback technologies. Then suddenly, with the rise of computer technology in the second half of the 20th century we gained the ability to not only perform analog-to-digital conversion, but also store the resulting digital format in a way that promised near-perfect reproduction.

Digital optical discs and tapes found themselves competing with analog formats like the compact cassette and vinyl records. While video and photos remained analog for a long time in the form of VHS tapes and film, eventually these all gave way to the fully digital world of digital cameras, JPEGs, PNGs, DVDs and MPEG. Despite the theoretical pixel- and note-perfect reproduction of digital formats, considerations like sampling speed (Nyquist frequency) and the aforementioned quantization errors mean a range of new headaches to address.

That said, the first use of dithering was actually in the 19th century, when newspapers and other printed media were looking to print phots without the hassle of having a woodcut or engraving made. This led to the invention of halftone printing.

Polka Dots

Left: halftone dot pattern with increasing size downwards, Right: how the human eye would see this, when viewed from a sufficient distance. (Credit: Wikimedia)Left: halftone dot pattern with increasing size downwards, Right: how the human eye would see this, when viewed from a sufficient distance. (Source: Wikimedia)

With early printing methods, illustrations were limited to an all-or-nothing approach with their ink coverage. This obviously meant serious limitations when it came to more detailed illustrations and photographs, until the  arrival of the halftone printing method. First patented in 1852  by William Fox Talbot, his approach used a special screen to break down an image into discrete points on a photographic plate. After developing this into a printing plate, these plates would then print this pattern of differently sized points.

Although the exact halftone printing methods were refined over the following decades, the basic principle remains the same to this day: by varying the size of the dot and the surrounding empty (white) space, the perceived brightness changes. When this method got extended to color prints with the CMYK color model, the resulting printing of these three colors as adjoining dots allowed for full-color photographs to be printed in newspapers and magazines despite having only so few ink colors available.

While it’s also possible to do CMYK printing with blending of the inks, as in e.g. inkjet printers, this comes with some disadvantages especially when printing on thin, low-quality paper, such as that used for newspapers, as the ink saturation can cause the paper to rip and distort. This makes CMYK and monochrome dithering still a popular technique for newspapers and similar low-fidelity applications.

Color Palettes

In an ideal world, every image would have an unlimited color depth. Unfortunately we sometimes have to adapt to a narrower color space, such as when converting to the Graphics Interchange Format (GIF), which is limited to 8 bits per pixel. This 1987-era and still very popular format thus provides an astounding 256 possible colors  -albeit from a full 24-bit color space – which poses a bit of a challenge when using a 24-bit PNG or similar format as the source. Simply reducing the bit depth causes horrible color banding, which means that we should use dithering to ease these sharp transitions, like the very common Floyd-Steinberg dithering algorithm:

From left to right: original image. Converted to web safe color. Web safe with Floyd-Steinberg dithering. (Credit: Wikipedia)From left to right: original image. Converted to web safe color. Web safe with Floyd-Steinberg dithering. (Source: Wikipedia)

The Floyd-Steinberg dithering algorithm was created in 1976 by Robert W. Floyd and Louis Steinberg. Its approach to dithering is based on error diffusion, meaning that it takes the quantization error that causes the sharp banding and distributes it across neighboring pixels. This way transitions are less abrupt, even if it means that there is noticeable image degradation (i.e. noise) compared to the original.

This algorithm is quite straightforward, working its way down the image one pixel at a time without affecting previously processed pixels. After obtaining the current pixel’s quantization error, this is distributed across the subsequent pixels following and below the current one, as in the below pseudo code:

for each y from top to bottom do for each x from left to right do oldpixel := pixels[x][y] newpixel := find_closest_palette_color(oldpixel) pixels[x][y] := newpixel quant_error := oldpixel - newpixel pixels[x + 1][y ] := pixels[x + 1][y ] + quant_error × 7 / 16 pixels[x - 1][y + 1] := pixels[x - 1][y + 1] + quant_error × 3 / 16 pixels[x ][y + 1] := pixels[x ][y + 1] + quant_error × 5 / 16 pixels[x + 1][y + 1] := pixels[x + 1][y + 1] + quant_error × 1 / 16

The implementation of the find_closest_palette_color() function is key here, with for a greyscale image a simple round(oldpixel / 255) sufficing, or trunc(oldpixel + 0.5) as suggested in this CS 559 course material from 2000 by the Universe of Wisconsin-Madison.

As basic as Floyd-Steinberg is, it’s still commonly used today due to the good results that it gives with fairly minimal effort. Which is not to say that there aren’t other dithering algorithms out there, with the Wikipedia entry on dithering helpfully pointing out a number of alternatives, both within the same error diffusion category as well as other categories like ordered dithering. In the case of ordered dithering there is a distinct crosshatch pattern that is both very recognizable and potentially off-putting.

Dithering is of course performed here to compensate for a lack of bit-depth, meaning that it will never look as good as the original image, but the less obnoxious the resulting artefacts are, the better.

Dithering With Audio

Although at first glance dithering with digital audio seems far removed from dithering the quantization error with images, the same principles apply here. When for example the original recording has to be downsampled to CD-quality (i.e. 16-bit) audio, we can either round or truncate the original samples to get the desired sample size, but we’d get distortion in either case. This distortion is highly noticeable by the human ear as the quantization errors create new frequencies and harmonics, this is quite noticeable in the 16- to 6-bit downsampling examples provided in the Wikipedia entry.

In the sample with dithering, there is clearly noise audible, but the original signal (a sine wave) now sounds pretty close to the original signal. This is done through the adding of random noise to each sample by randomly rounding up or down and counting on the average. Although random noise is clearly audible in the final result, it’s significantly better than the undithered version.

Random noise distribution is also possible with images, but more refined methods tend to give better results. For audio processing there are alternative noise distributions and noise shaping approaches.

Regardless of which dither method is being applied, it remains fascinating how the humble printing press and quantization errors have led to so many different ways to trick the human eye and ear into accepting lower fidelity content. As many of the technical limitations that existed during the time of their conception – such as expensive storage and low bandwidth – have now mostly vanished, it will be interesting to see how dithering usage evolves over the coming years and decades.

Featured image: “JJN Dithering” from [Tanner Helland]’s great dithering writeup.


From Blog – Hackaday via this RSS feed

5


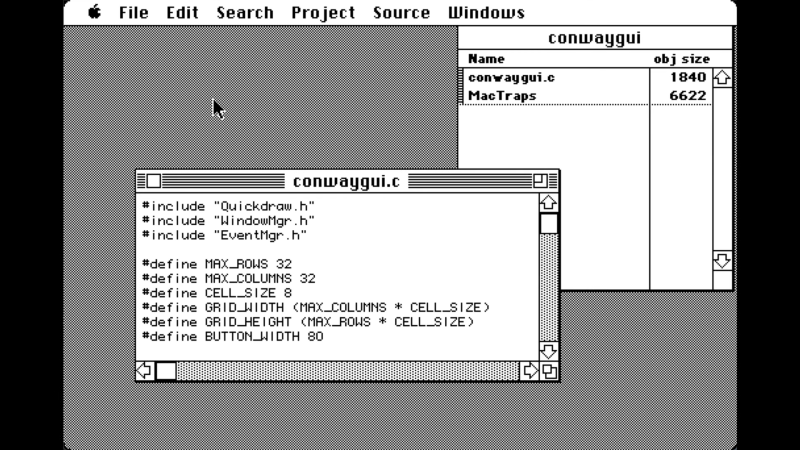
screenshot of C programming on Macintosh Plus

Some people slander retrocomputing as an old man’s game, just because most of those involved are more ancient than the hardware they’re playing with. But there are veritable children involved too — take the [ComputerSmith], who is recreating Conway’s game of life on a Macintosh Plus that could very well be as old as his parents. If there’s any nostalgia here, it’s at least a generation removed — thus proving for the haters that there’s more than a misplaced desire to relive one’s youth in exploring these ancient machines.

So what does a young person get out of programming on a 1980s Mac? Well, aside from internet clout, and possible YouTube monetization, there’s the sheer intellectual challenge of the thing. You cant go sniffing around StackExchange or LLMs for code to copy-paste when writing C for a 1986 machine, not if you’re going to be fully authentic. ANSI C only dates to 1987, after all, and figuring out the quirks and foibles of the specific C implementation is both half the fun, and not easily outsourced. Object Pascal would also have been an option (and quite likely more straightforward — at least the language was clearly-defined), but [ComputerSmith] seems to think the exercise will improve his chops with C, and he’s likely to be right. 

Apparently [ComputerSmith] brought this project to VCS Southwest, so anyone who was there doesn’t have to wait for Part 2 of the video to show up to see how this turns out, or to snag a copy of the code (which was apparently available on diskette). If you were there, let us know if you spotted the youngest Macintosh Plus programmer, and if you scored a disk from him.

If the idea of coding in this era tickles the dopamine receptors, check out this how-to for a prizewinning Amiga demo.  If you think pre-ANSI C isn’t retro enough, perhaps you’d prefer programming by card?


From Blog – Hackaday via this RSS feed

6


Over the course of evolution microorganisms have evolved pathways to break down many materials. The challenge with the many materials that we humans have created over just the past decades is that we cannot wait for evolution to catch up, ergo we have to develop such pathways ourselves. One such example is demonstrated by [Nick W. Johnson] et al. with a recent study in Nature Chemistry that explicitly targets PET plastic, which is very commonly used in plastic bottles.

The researchers modified regular E. coli bacteria to use PET plastic as an input via Lossen rearrangement, which converts hydroxamate esters to isocyanates, with at the end of the pathway para-aminobenzoate (PABA)  resulting, which using biosynthesis created paracetamol, the active ingredient in Tylenol. This new pathway is also completely harmless to the bacterium, which is always a potential pitfall with this kind of biological pathway engineering.

In addition to this offering a potential way to convert PET bottles into paracetamol, the researchers note that their findings could be very beneficial to studies targeting other ‘waste’ products from biological pathways.

Thanks to [DjBiohazard] for the tip.


From Blog – Hackaday via this RSS feed

7


From the very dawn of the personal computing era, the PC and Apple platforms have gone very different ways. IBM compatibles surged in popularity, while Apple was able to more closely guard the Macintosh from imitators wanting to duplicate its hardware and run its software.

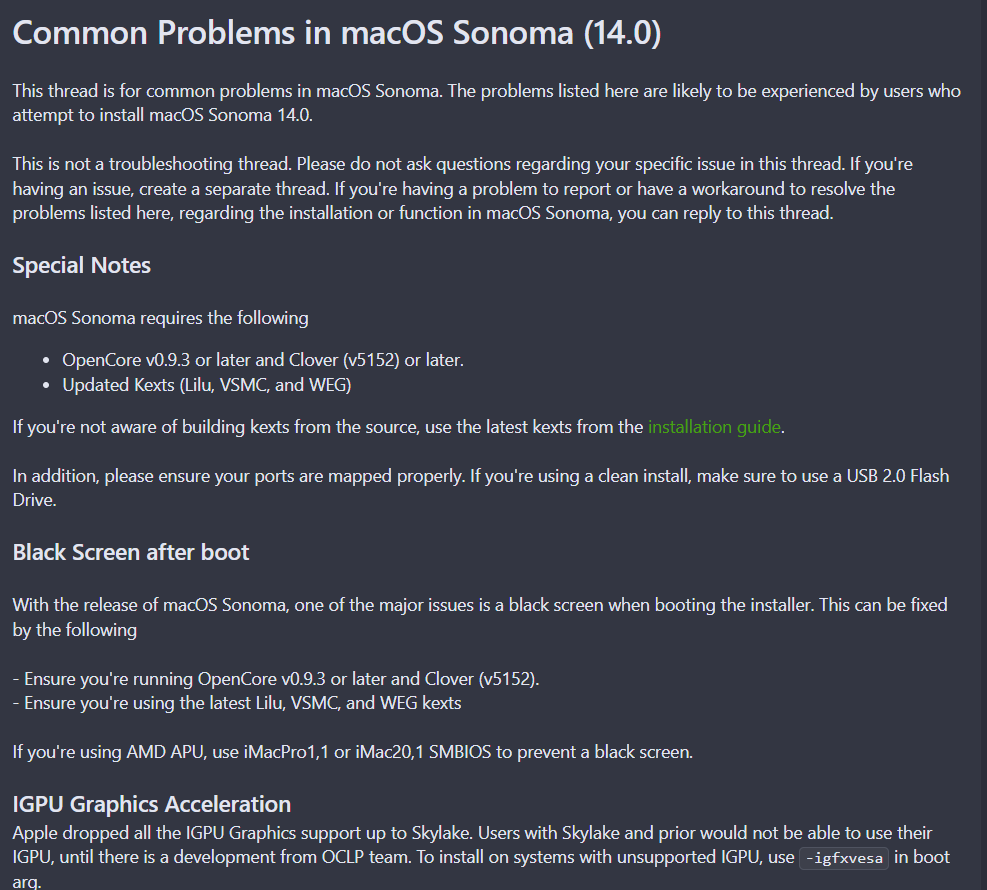
Things changed when Apple announced it would hop aboard the x86 bandwagon in 2005. Soon enough was born the Hackintosh. It was difficult, yet possible, to run MacOS on your own computer built with the PC parts your heart desired.

Only, the Hackintosh era is now coming to the end. With the transition to Apple Silicon all but complete, MacOS will abandon the Intel world once more.

End Of An Era

macOS Tahoe is slated to drop later this year. Credit: Apple

2025 saw the 36th Worldwide Developers Conference take place in June, and with it, came the announcement of macOS Tahoe. The latest version of Apple’s full-fat operating system will offer more interface customization, improved search features, and the new attractive ‘Liquid Glass’ design language. More critically, however, it will also be the last version of the modern MacOS to support Apple’s now aging line of x86-based computers.

The latest OS will support both Apple Silicon machines as well as a small list of older Macs. Namely, if you’ve got anything with an M1 or newer, you’re onboard. If you’re Intel-based, though, you might be out of luck. It will run on the MacBook Pro 16 inch from 2019, as well as the MacBook Pro 13-inch from 2020, but only the model with four Thunderbolt 3 ports. It will also support iMacs and Mac Minis from 2020 or later. As for the Mac Pro, you’ll need one from 2019 or later, or 2022 or later for the Mac Studio.

Basically, beyond the release of Tahoe, Apple will stop releasing versions of its operating system for x86 systems. Going forward, it will only be compiling MacOS for ARM-based Apple Silicon machines.

How It Was Done

Of course, it’s worth remembering that Apple never wanted random PC builders to be able to run macOS to begin with. Yes, it will eventually stop making an x86 version of its operating system, but it had already gone to great lengths trying to stop macOS from running on non-authorized hardware. The dream of a Hackintosh was to build a powerful computer on the cheap, without having to pay Apple’s exorbitant prices for things like hard drive, CPU, and memory upgrades. However, you always had to jump through hoops, using hacks to fool macOS into running on a computer that Apple never built.

Installing macOS on a PC takes some doing.

Getting a Hackintosh running generally involved pulling down special patches crafted by a dedicated community of hackers. Soon after Apple started building x86 machines, hackers rushed to circumvent security features in what was then called Mac OS X, allowing it to run on non-Apple approved machines. The first patches landed just over a month after the first x86 Macs. Each subsequent Apple update to OS X locked things down further, only for the community to release new patches unlocking the operating system in quick succession. Sometimes this involved emulating the EFI subsystem which contemporary Macs used in place of a traditional PC’s BIOS. Sometimes it was involved as tweaking the kernel to stick to older SSE2 instructions when Apple’s use of SS3 instructions stopped the operating system running on older hardware. Depending on the precise machine you were building, and the version of OS X or MacOS that you hoped to run, you’d use different patches or hacks to get your machine booting, installing, and running to operating system.

Hackintosh communities maintain lists of bugs and things that don’t work quite right—no surprise given Apple’s developers put little thought into making their OS work on unofficial hardware. Credit: eliteMacx86.com via Screenshot

Running a Hackintosh often involved dealing with limitations. Apple’s operating system was never intended to run on just any hardware, after all. Typical hurdles included having to use specific GPUs or WiFi cards, for example, since broad support for the wide range of PC parts just wasn’t there. Similarly, sometimes certain motherboards wouldn’t work, or would require specific workarounds to make Apple’s operating system happy in a particularly unfamiliar environment.

Of course, you can still build a Hackintosh today. Instructions exist for installing and running macOS Sequoia (macOS 15), macOS Sonoma (macOS 14), as well as a whole host of earlier versions all the way back to when it was still called Mac OS X. When macOS Tahoe drops later this year, the community will likely work to make the x86 version run on any old PC hardware. Beyond that, though, the story will end, as Apple continues to walk farther into its ARM-powered future.

Ultimately, what the Hackintosh offered was choice. It wasn’t convenient, but if you were in love with macOS, it let you do what Apple said was verboten. You didn’t have to pay for expensive first party parts, and you could build your machine in the manner to which you were accustomed. You could have your cake and eat it too, which is to say that you could run the Mac version of Photoshop because that apparently mattered to some people. Now, all that’s over, so if you love weird modifier keys on your keyboard and a sleek, glassy operating system, you’ll have to pay the big bucks for Apple hardware again. The Hackintosh is dead. Long live Apple Silicon, so it goes.


From Blog – Hackaday via this RSS feed
8


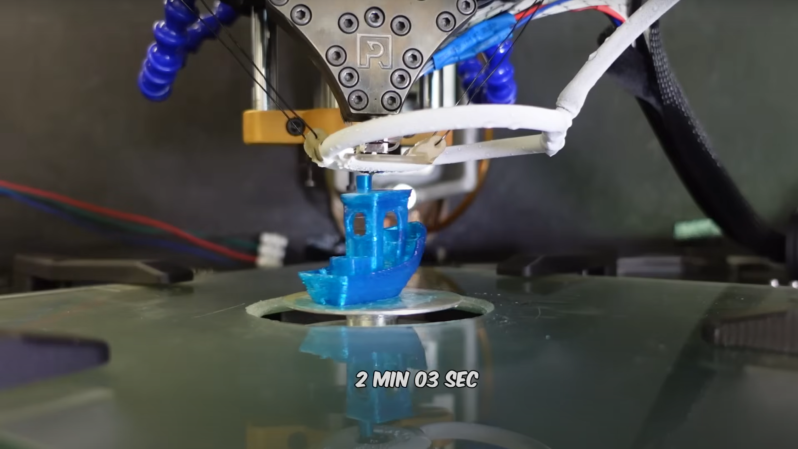
A blue 3DBenchy is visible on a small circular plate extending up through a cutout in a flat, reflective surface. Above the Benchy is a roughly triangular metal 3D printer extruder, with a frost-covered ring around the nozzle. A label below the Benchy reads “2 MIN 03 SEC.”

Commercial 3D printers keep getting faster and faster, but we can confidently say that none of them is nearly as fast as [Jan]’s Minuteman printer, so named for its goal of eventually printing a 3DBenchy in less than a minute. The Minuteman uses an air bearing as its print bed, feeds four streams of filament into one printhead for faster extrusion, and in [Jan]’s latest video, printed a Benchy in just over two minutes at much higher quality than previous two-minute Benchies.

[Jan] found that the biggest speed bottleneck was in cooling a layer quickly enough that it would solidify before the printer laid down the next layer. He was able to get his layer speed down to about 0.6-0.4 seconds per layer, but had trouble going beyond that. He was able to improve the quality of his prints, however, by varying the nozzle temperature throughout the print. For this he used [Salim BELAYEL]’s postprocessing script, which increases hotend temperature when volumetric flow rate is high, and decreases it when flow rate is low. This keeps the plastic coming out of the nozzle at an approximately constant temperature. With this, [Jan] could print quite good sub-four and sub-thee minute Benchies, with almost no print degradation from the five-minute version. [Jan] predicts that this will become a standard feature of slicers, and we have to agree that this could help even less speed-obsessed printers.

Now onto less generally-applicable optimizations: [Jan] still needed stronger cooling to get faster prints, so he designed a circular duct that directed a plane of compressed air horizontally toward the nozzle, in the manner of an air knife. This wasn’t quite enough, so he precooled his compressed air with dry ice. This made it both colder and denser, both of which made it a better coolant. The thermal gradient this produced in the print bed seemed to cause it to warp, making bed adhesion inconsistent. However, it did increase build quality, and [Jan]’s confident that he’s made the best two-minute Benchy yet.

If you’re curious about Minuteman’s motion system, we’ve previously looked at how that was built. Of course, it’s also possible to speed up prints by simply adding more extruders.


From Blog – Hackaday via this RSS feed

9


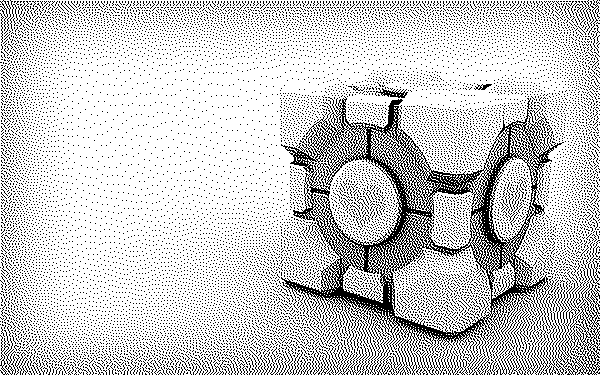
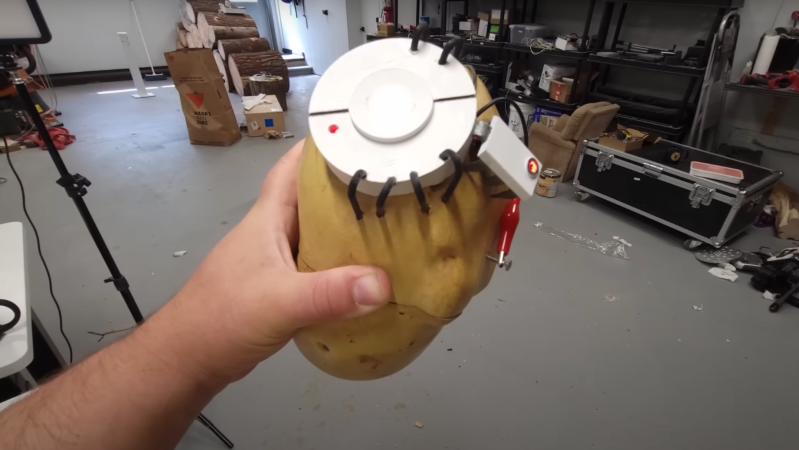
A man’s hand is visible holding a large, potato-shaped object in the foreground. A short, white, cylindrical structure is on the top of the potato, with black wires bending back into the potato. A smaller rectangular structure is to one side of it, and a red alligator clip connects to a nail protruding from the potato.

Although not nearly as intimidating as her ceiling-mounted hanging arm body, GLaDOS spent a significant portion of the Portal 2 game in a stripped-down computer powered by a potato battery. [Dave] had already made a version of her original body, but it was built around a robotic arm that was too expensive for the project to be really accessible. For his latest project, therefore, he’s created a AI-powered version of GLaDOS’s potato-based incarnation, which also serves as a fun introduction to building AI systems.

[Dave] wanted the system to work offline, so he needed a computer powerful enough to run all of his software locally. He chose an Nvidia Jetson Orin Nano, which was powerful enough to run a workable software system, albeit slowly and with some memory limitations. A potato cell unfortunately doesn’t generate enough power to run a Jetson, and it would be difficult to find a potato large enough to fit the Jetson inside. Instead, [Dave] 3D-printed and painted a potato-shaped enclosure for the Jetson, a microphone, a speaker, and some supplemental electronics.

A large language model handles interactions with the user, but most models were too large to fit on the Jetson. [Dave] eventually selected Llama 3.2, and used LlamaIndex to preprocess information from the Portal wiki for retrieval-augmented generation. The model’s prompt was a bit difficult, but after contacting a prompt engineer, [Dave] managed to get it to respond to the hapless user in an appropriately acerbic manner. For speech generation, [Dave] used Piper after training it on audio files from the Portal wiki, and for speech recognition used Vosk (a good programming exercise, Vosk being, in his words, “somewhat documented”). He’s made all of the final code available on GitHub under the fitting name of PotatOS.

The end result is a handheld device that sarcastically insults anyone seeking its guidance. At least Dave had the good sense not to give this pernicious potato control over his home.


From Blog – Hackaday via this RSS feed

10


Pretty purple PCBs, made in the USA

These are tough times for American hackers, and rife with uncertainty. Trade wars are on, off, on again– who can keep track? If you’re used to getting everything from China, that can really cramp your style. [Jeremy Cook] took the time to write up his experience prototyping with American-made PCBs , just in time for us to totally miss Independence Day.

The project was a simple nightlight, using a single LED, a photoresistor, a transistor, and a CR2032 battery. The CR2032 battery does complicate things, though: [Jeremy] figured out a neat way to hold the battery using a PCB cutout, but it needs to be a 0.8 mm board. (That’s going to matter in a moment.) He’s put that PCB on GitHub if you’re interested.

To start off, JLBPCB is the Chinese clearing house of choice for [Jeremy], and they quoted a very cheap $7.10 for 20 boards. The problem was that shipping across the Pacific Ocean, plus the ever-wavering tariff charge, brought the price to $48.08. About five dollars of which was from tariffs; the rest you can put down to the cost of jet fuel and the size of the Pacific Ocean.

On the other hand, OSH Park, was able to get [Jeremy] three of their pretty purple PCBs for $7.75 all-inclusive. Overall, since he’s prototyping and does not want 20 boards this revision, [Jeremy] saves quite a lot by staying local– including the environmental impact of shipping and laxer regulations in China, if that sort of thing matters to you. 

The suprizing thing is the turnaround time: [Jeremy] got his pretty purple PCBs from OSH Park a full twenty days after ordering. Similar orders from China take only a week, which is just mind-blowing when you stop and think about the great honking ocean in the way. We could perhaps cut OSH Park some slack in that 0.8 mm boards are not the most common, but their quoted turnaround time for two-layer prototypes is minimum 12 days.

They do offer a “super-swift” option for two-layer boards, but then they lose on price. As [Jeremy] points out, there are always tradeoffs. If you’re really in a hurry, nothing’s faster than milling the boards yourself. Or you could go the old-school toner-transfer etching route.

Our thanks to [Jeremy] for the tip. If you’ve got a better way to prototype, do send us a tip about it. Also, please us know in the comments if you’ve tried an in-country PCB fabricator, and how it compared to the usual offerings from the PRC.


From Blog – Hackaday via this RSS feed

11


How would you go about identifying usable land that suits your building tastes? [Scott Sexton] was specifically, looking for land that’s not to steep to build on, and realized that existing resources didn’t easily offer him this information. He thus dived into the world of GIS to try and solve this issue for himself.

[Scott] hoped that USGS maps might provide the information he needed, but found they lacked grade information, only presenting elevation and topographic data instead. From past experience reading such maps, he knew that seeing a lot of topographical lines close together tended to indicate steeper areas, but wasn’t sure on how to actually get the computer to parse this and spit out the information on steepness and grade that he wanted.

Ultimately, he set about downloading USGS elevation data in three meter resolution. He then applied some calculus to determine the rate of change of the slope across areas of the data in order to mathematically find what he was looking for. Namely, flatter areas that would be more suitable for future construction. He then took the work even further, tweaking the output of his tools and automating until he could quickly and readily generate usability maps of areas of interest. He was even able to sanity check his work by seeing if it correctly identified roads as obvious flatter areas.

If you’ve ever tinkered with GIS work, [Scott’s] usability project may be of some interest. We’ve also seen amusing examples of what can go wrong when digital mapping data is used without sanity checks. Meanwhile, if you’re got your own GIS hacks on the go, don’t hesitate to notify us via the tipsline!


From Blog – Hackaday via this RSS feed
12


In the past few years, what marketers and venture capital firms term “artificial intelligence” but is more often an advanced predictive text model of some sort has started taking people’s jobs and threatening others. But not tedious jobs that society might like to have automated away in the first place. These AI tools have generally been taking rewarding or enjoyable jobs like artist, author, filmmaker, programmer, and composer. This project from a research team might soon be able to add astronaut to that list.

The team was working within the confines of the Kerbal Space Program Differential Game Challenge, an open-source plugin from MIT that allows developers to test various algorithms and artificial intelligences in simulated spacecraft situations. Generally, purpose-built models are used here with many rounds of refinement and testing, but since this process can be time consuming and costly the researchers on this team decided to hand over control to ChatGPT with only limited instructions. A translation layer built by the researchers allows generated text to be converted to spacecraft controls.

We’ll note that, at least as of right now, large language models haven’t taken the jobs of any actual astronauts yet. The game challenge is generally meant for non-manned spacecraft like orbital satellites which often need to make their own decisions to maintain orbits and avoid obstacles. This specific model was able to place second in a recent competition as well, although we’ll keep rooting for humans in certain situations like these.


From Blog – Hackaday via this RSS feed

13


It’s always clock time at Hackaday, and this time we have an interesting hack of a clock by [danjovic]– the CIS4, a Cistercian digital clock.

The Cistertians, in case you weren’t paying close attention to European holy orders during the 13th to 15th centuries were the group of monks you’d most likely have found us in. They were the hackers of the middle ages, establishing monestaries across western Europe that were chock full of hacks– including their own numeral system. Cistercian numerals were much more efficient (in spaces and penstrokes) than the Roman numerals they replaced, and even the “Arabic” numerals that replaced them. A single glyph could record anything from 1 to 9,999. (The Europeans hadn’t yet cottoned on to zero.)

The Cistertian glyphs reduced to a 4×4 display.

Depending how you wanted to count time, a single glyph could be used; it looks like [danjovic] is using the thousands and hundreds portions of the glyph for hours and the tens and ones for minutes. This is all accomplished with a 4×4 neopixel matrix, run by an Attiny85 Digispark with a DS3231 RTC module keeping time. A slight simplification is required to reduce the glyphs to 4×4, but we don’t think the monks would mind. For those of us who don’t wear tonsures, an easy read mode scrolls the time in Arabic numerals. (Which still aren’t super easy,with only 4×4 LEDs to display them. See the demo video embedded below and try and guess the time.)

One nice quality of life feature is an LDR for ambient light detection, to automatically adjust the neopixels’ brightness. The hackiest part, which we thought was really clever, is the enclosure: it’s a cheap LED ceiling light. This provides a diffuser, housing and mounting hardware with decent design for no effort. A 3D-printed mask sits between the diffuser and the LEDs and doubles as a PCB holder. All very elegant.

[danjovic] did include a buzzer in the design, but does say if its been programed to sound off for matins, nones and vespers. In any case, at least it’s easier to read than his binary-coded-octal clock that we featured a few years back. This isn’t our first look at this number system,so evidently people can read them with practice.

Have you made or seen a cool clock? Send us a tip. We always have time for clocks.


From Blog – Hackaday via this RSS feed

14


Good news, procrastinators! Today was going to be the last day to throw your hat in the ring for a slot to talk at Supercon in November, but we’re extending the deadline one more week, until July 10th. We have an almost full schedule, but we’re still missing your talk.

So if the thought of having missed the deadline fills you with regret, here’s your second chance. We have spots for both 40-minute and 20-minute talks still open. We love to have a mix of newcomers as well as longtime Hackaday friends, so don’t be shy.

Supercon is a super fun time, and the crowd is full of energy and excitement for projects of all kinds. There is no better audience to present your feats of hardware derring-do, stories of reverse engineering, or other plans for world domination. Where else will you find such a density of like-minded hackers?

Don’t delay, get your talk proposal in today.


From Blog – Hackaday via this RSS feed

15


There are all manner of musical myths, covering tones and melodies that have effects ranging from the profound to the supernatural. The Pied Piper, for example, or the infamous “brown note.”

But what about a song that could crash your laptop just by playing it? Even better, a song that could crash nearby laptops in the vicinity, too? It’s not magic, and it’s not a trick—it was just a punchy pop song that Janet Jackson wrote back in 1989.

Rhythm Nation

As told by Microsoft’s Raymond Chen, the story begins in the early 2000s during the Windows XP era. Engineers at a certain OEM laptop manufacturer noticed something peculiar. Playing Janet Jackson’s song Rhythm Nation through laptop speakers would cause the machines to crash. Even more bizarrely, the song could crash nearby laptops that weren’t even playing the track themselves, and the effect was noted across laptops of multiple manufacturers.

Rhythm Nation was a popular song from Jackson’s catalog, but nothing about it immediately stands out as a laptop killer.

After extensive testing and process of elimination, the culprit was identified as the audio frequencies within the song itself. It came down to the hardware of the early 2000s laptops in question. These machines relied on good old mechanical hard drives. Specifically, they used 2.5-inch 5,400 RPM drives with spinning platters, magnetic heads, and actuator arms.

The story revolves around 5,400 RPM laptop hard drives, but the manufacturer and model are not public knowledge. No reports have been made of desktop PCs or hard disks suffering the same issue. Credit: Raimond Spekking, CC BY-SA 4.0

Unlike today’s solid-state drives, these components were particularly susceptible to physical vibration. Investigation determined that something in Rhythm Nation was hitting a resonant frequency of some component of the drive. When this occurred, the drive would be disturbed enough that read errors would stack up to the point where it would trigger a crash in the operating system. The problem wasn’t bad enough to crash the actual hard drive head into the platters themselves, which would have created major data loss. It was just bad enough to disrupt the hard drive’s ability to read properly, to the point where it could trigger a crash in the operating system.

A research paper published in 2018 investigated the vibrational characteristics of a certain model of 2.5-inch laptop hard drive. It’s not conclusive evidence, and has nothing to do with the Janet Jackson case, but it provides some potentially interesting insights as to why similar hard drives failed to read when the song was played. Credit: Research paper

There was a simple workaround for this problem, that was either ingenious or egregious depending on your point of view. Allegedly, the OEM simply whipped up a notch filter for the audio subsystem to remove the offending frequencies. The filter apparently remained in place from the then-contemporary Windows XP up until at least Windows 7. At this point, Microsoft created a new rule for “Audio Processing Objects” (APO) which included things like the special notch filter. The rule stated that all of these filters must be able to be switched off if so desired by the user. However, the story goes that the manufacturer gained a special exception for some time to leave their filter APO on at all times, to prevent users disabling it and then despairing when their laptops suddenly started crashing unexpectedly during Janet Jackson playlists.

As for what made Rhythm Nation special? YouTuber Adam Neely investigated, and came up with a compelling theory. Having read a research paper on the vibrational behavior of a 2.5-inch 5,400 RPM laptop hard disk, he found that it reported the drive to have its largest vibrational peak at approximately 87.5 Hz.  Meanwhile, he also found that Rhythm Nationhad a great deal of energy at 84.2 Hz. Apparently, the recording had been sped up a touch after the recording process, pushing the usual low E at 82 Hz up slightly higher. The theory being that the mild uptuning in Rhythm Nationpushed parts of the song close enough to the resonant frequency of some of the hard drive’s components to give them a good old shaking, causing the read errors and eventual crashes.

It’s an interesting confluence of unintended consequences. A singular pop song from 1989 ended up crashing laptops over a decade later, leading to the implementation of an obscure and little-known audio filter. The story still has holes—nobody has ever come forward to state officially which OEM was involved, and which precise laptops and hard drives suffered this problem. That stymies hopes for further research and recreation of this peculiarity. Nevertheless, it’s a fun tech tale from the days when computers were ever so slightly more mechanical than they are today.


From Blog – Hackaday via this RSS feed
16


It’s been awhile since we checked in with Canada’s Edison Motors, so let’s visit [DeBoss Garage] for an update video. To recap, Edison Motors is a Canadian company building diesel-electric hybrid semi-trucks and more.

Arial view of Edison's new propertyThe last interesting thing to happen in Donald, BC was when it burned down in the 1910s.

Well, they’ve thankfully moved out of the tent in their parents’ back yard where the prototype was built. They’ve bought themselves a company town: Donald, British Columbia, complete with a totally-not-controversial slogan “Make Donald Great Again”.

More interesting is that their commercial-off-the-shelf (COTS), right-to-repair centered approach isn’t just for semi-trucks: they’re now a certified OEM manufacturer of a rolling heavy truck chassis you can put your truck cab or RV body on, and they have partnered with three coach-builders for RVs and a goodly number of manufacturing partners for truck conversion kits. The kits were always in the plan, but selling the rolling chassis is new.

One amazingly honest take-away from the video is the lack of numbers for the pickups: top speed, shaft horsepower, torque? They know what all that should be, but unlike the typical vaporware startup, Edison won’t tell you the engineering numbers on the pickup truck kits until it has hit the race track and proved itself in the real world. These guys are gear-heads first and engineers second, so for once in a long time the adage “engineers hate mechanics” might not apply to a new vehicle.

The dirt track is the first thing under construction in Donald, so hopefully the next update we hear from Edison Motors will include those hard numbers, including pesky little things like MSRP and delivery dates. Stay tuned.

In our last post about an electric truck, a lot of you in the comments wanted something bigger, heavier duty, not pure battery, and made outside the USA. Well, here it is.

Thanks to [Keith Olson] for the tip. Remember, the lines are always open!


From Blog – Hackaday via this RSS feed
17


What if you electroplated a plastic 3D print, and then melted off the plastic to leave just the metal behind? [HEN3DRIK] has been experimenting with just such a process, with some impressive results.

For this work, [HEN3DRIK] prints objects in a special PVB “casting filament” which has some useful properties. It can be smoothed with isopropanol, and it’s also intended to be burnt off when used in casting processes. Once the prints come off the printer, [HEN3DRIK] runs a vapor polishing process to improve the surface finish, and then coats the print with copper paint to make the plastic conductive on the surface. From there, the parts are electroplated with copper to create a shiny metallic surface approximately 240 micrometers thick. The final step was to blowtorch out the casting filament to leave behind just a metal shell. The only problem is that all the fire tends to leave an ugly oxide layer on the copper parts, so there’s some finishing work to be done to get them looking shiny again.

We’ve featured [HEN3DRIK]’s work before, particularly involving his creation of electroplated 3D prints with mirror finishes. That might be a great place to start your research if you’re interested in this new work. Video after the break.


From Blog – Hackaday via this RSS feed
18


People have been talking about switching from Windows to Linux since the 1990s, but in the world of open-source operating systems, there is much more variety than just the hundreds of flavors of Linux-based operating systems today. Take FreeBSD, for example. In a recent [GNULectures] video, we get to see a user’s attempt to switch from desktop Linux to desktop FreeBSD.

The interesting thing here is that both are similar and yet very different, mainly owing to their very different histories, with FreeBSD being a direct derivative of the original UNIX and its BSD derivative. One of the most significant differences is probably that Linux is just a kernel, with (usually) the GNU/Hurd userland glued on top of it to create GNU/Linux. GNU and BSD userland are similar, and yet different, with varying levels of POSIX support. This effectively means that FreeBSD is a singular OS with rather nice documentation (the FreeBSD handbook).

The basic summary here is that FreeBSD is rather impressive and easy to set up for a desktop, especially if you use a customized version like GhostBSD. Despite Libreboot, laptop power management, OSB NVENC, printer, and WiFi issues, it was noted that none of these are uncommon with GNU/Linux either. Having a single package manager (pkg) for all of FreeBSD (and derivatives) simplifies things a lot. The bhyve hypervisor makes running VMs a snap. A robust ZFS filesystem is also a big plus.

What counts against desktop FreeBSD in the end is a less refined experience in some areas, despite FreeBSD being able to run Linux applications courtesy of binary compatibility. With some developer love and care, FreeBSD might make for a nice desktop alternative to GNU/Linux before long, one that could be tempting even for the die-hard Windows holdouts among us.


From Blog – Hackaday via this RSS feed

19


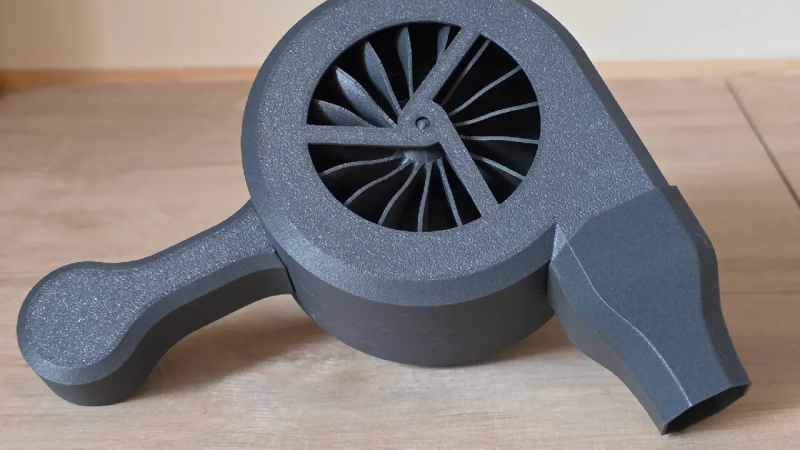
There was a time when print-in-place moving parts were a curiosity, but [Tomek] shows that things are now at a point where a hand-cranked turbine blower with integrated planetary gears can be entirely 3D printed. Some assembly is needed, but there is no added hardware beyond the printed parts. The blower is capable of decent airflow and can probably be optimized even further. Have a look at it work in the video below.

Every piece being 3D printed brings a few advantages. Prefer the hand crank on the other side? Simply mirror everything. Want a bigger version? Just scale everything up. Because all of the fasteners are printed as well as the parts, there’s no worry about external hardware no longer fitting oversized holes after scaling things up (scaling down might run into issues with tolerances, but if you manage an extra-small version, we’d love to hear about it).

There are a few good tips that are worth keeping in mind when it comes to print-in-place assemblies with moving parts. First, changing the seam location for each layer to ‘Random’ helps make moving parts smoother. This helps prevent the formation of a seam line, which can act as a little speed bump that gets in the way of smooth movement.

The other thing that helps is lubrication. A plastic-safe lubricant like PTFE-based Super Lube is a handy thing to have around the workshop and does wonders for smoothing out the action of 3D-printed moving parts. And we can attest that rubbing candle wax on mating surfaces works pretty well in a pinch.

One downside is that the blower is noisy in operation. 3D printed gears (and even printed bearings) can be effective, but do contribute to a distinct lack of silence compared to their purpose-built versions.

Still, a device like this is a sign of how far 3D printing has come, and how it enables projects that would otherwise remain an idea in a notebook. We do love 3D-printed gears.


From Blog – Hackaday via this RSS feed

20


Ploppy knob

The world of custom mechanical keyboards is vibrant, with new designs emerging weekly. However, keyboards are just one way we interact with computers. Ploopy, an open-source hardware company, focuses on innovative user interface devices. Recently, [Colin] from Ploopy introduced their latest creation: the Ploopy Knob, a compact and thoughtfully designed control device.

At first glance, the Ploopy Knob’s low-profile design may seem unassuming. Housed in a 3D-printed enclosure roughly the size of a large wristwatch, it contains a custom PCB powered by a USB-C connection. At its core, an RP2040 chip runs QMK firmware, enabling users to easily customize the knob’s functions.

The knob’s smooth rotation is achieved through a 6705ZZ bearing, which connects the top and bottom halves and spans nearly the device’s full width to eliminate wobble. Unlike traditional designs, the Ploopy Knob uses no mechanical encoder or potentiometer shaft. Instead, an AS5600 magnetic encoder detects movement with remarkable precision. This 12-bit rotary encoder can sense rotations as fine as 0.088 degrees, offering 4096 distinct positions for highly accurate control.

True to Ploopy’s philosophy, the Knob is fully open-source. On its GitHub Page, you’ll find everything from 3D-printed case files to RP2040 firmware, along with detailed guides for assembly and programming. This transparency empowers users to modify and build their own versions. Thanks to [Colin] for sharing this innovative device—we’re excited to see more open-source hardware from Ploopy. For those curious about other unique human-machine interfaces, check out our coverage of similar projects. Ploopy also has designs for trackballs (jump up a level on GitHub and you’ll see they have many interesting designs).


From Blog – Hackaday via this RSS feed

21


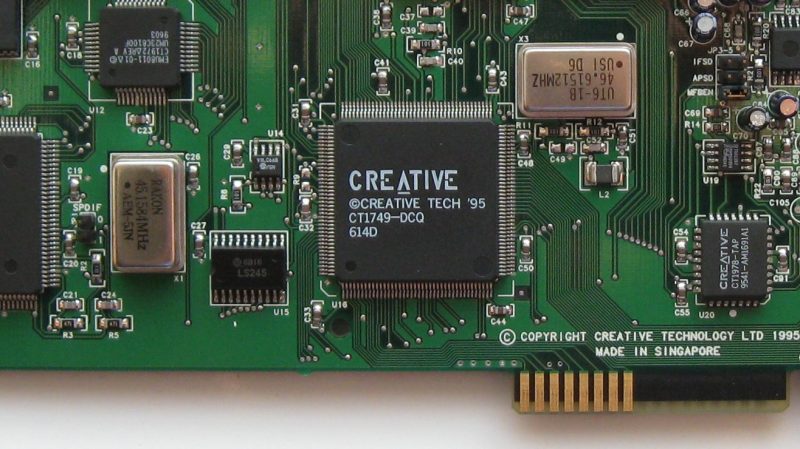
Old hardware tends to get less support as the years go by, from both manufacturers and the open-source community alike. And yet, every now and then, we hear about fresh attention for an ancient device. Consider the ancient SoundBlaster sound card that first hit the market 31 years ago. [Mark] noticed that a recent update squashed a new bug on an old piece of gear.

Jump over to the Linux kernel archive, and you’ll find a pull request for v6.16-rc3 from [Takashi Iwai]. The update featured fixes for a number of sound devices, but one stands out amongst the rest. It’s the SoundBlaster AWE32 ISA sound card, with [Iwai] noting “we still got a bug report after 25 years.” The bug in question appears to have been reported in 2023 by a user running Fedora 39 on a 120 MHz Pentium-based machine.

The fixes themselves are not particularly interesting. They merely concern minutiae about the DMA modes used with the old hardware. The new updates ensure that DMA modes cannot be changed while the AWE32 is playing a PCM audio stream, and that DMA setups are disabled when changing modes. This helps avoid system lockups and/or ugly noises emanating from the output of the soundcard.

It’s incredibly unlikely this update will affect you, unless you’re one of a handful of users still using an ISA soundcard in 2025. Still, if you are — and good on you — you’ll be pleased someone still cares about your user experience. Meanwhile, if you’re aware of any other obscure old-school driver updates going on out there, don’t hesitate to let us know on the tips line. Want to relive your ISA card’s glory days? Plug it into USB.

Image credit: Gona.eu, CC BY-SA 3.0

[Thanks to Meek Mark for the tip!]


From Blog – Hackaday via this RSS feed

22


The Ceran discs, freshly cut from the old stovetop and awaiting polishing. (Credit: Huygens Optics)

Ceran is a name brand for a type of glass ceramic that has a very low coefficient of thermal expansion (CTE). This is useful for stovetops, but it is also a highly desirable property for optical glass. The natural question: Can an old ceramic stovetop be upcycled into something visually striking? This is the topic of the most recent video in [Huygens Optics]’s series on glass ceramics.

Interestingly, by baking sections of the Ceran glass ceramic for 10 minutes at 961 °C, the CTE can be lowered by another five times, from 0.5 ppm / °C to a mere 0.1 ppm / °C. Following baking, you need a lot of grinding and polishing to remove any warping, existing textures, and printing. After polishing with 220 grit by hand for a few minutes, most of these issues were fixed, but for subsequent polishing, you want to use a machine to get the required nanometer-level precision, as well as to survive the six to eight hours of polishing.

Following this final polishing, the discs were ground into mirrors for a Newtonian telescope. This raised a small issue of the Ceran being only 4 mm thick, which requires doubling up two of the discs using a very thin layer of epoxy. After careful drilling, dodging cracked glass, and more polishing, this produced the world’s first ceramic stovetop upcycled into a telescope. We think it was the first, anyway. All that’s left is to coat the discs with a more reflective coating and install them into a telescope frame, but even in their raw state, they show the potential of this kind of material.

If you decide to try this, and you’ve already cut up your stove, you might as well attack some kitchen bowls, too.


From Blog – Hackaday via this RSS feed

23


If you’re unfamiliar with Beyblades, they’re a simple toy. They consist of spinning tops, which are designed to “fight” in arenas by knocking each other around. While the off-the-shelf models are deemed safe enough for children to play with, [Jon Bringus] decided to take the danger level up a few notches with some custom launchers of his own design.

[Jon]’s project started with some of the early metal Beyblades, which are traditionally launched with a small geared ripcord device. He soon realized he could up the action by doing one simple thing—spinning the tops far faster than the manufacturer ever intended. More rotational speed equals more kinetic energy equals more legal liability fun, or so the equation goes.

The design for [Jon’s] “WMD Launcher” is straightforward enough—he combined a lawnmower pull starter with a 12:1 geartrain to turn the Beyblades at truly ludicrous speeds. It’s basic engineering — a couple of 3D-printed gears do the job — but the results are hilarious. The tops begin to emit loud noises as they turn in combat, and some move so fast and erratically that they won’t even stay inside the arena. Protective eyewear is virtually mandatory. Files are on Printables for those eager to build one at home.

Yes, ruining a game of Beyblades is as simple as building an irresponsibly fast launcher. You needn’t even use some fancy brushless motor to hurt yourself — just a little gearing is enough to cause havoc. We’ve featured similar work on this topic before, too. Video after the break.


From Blog – Hackaday via this RSS feed

24


Most standing desks on the market use electric motors or hand cranks to raise and lower the deck. However, [Matthias Wandel] found a Kloud standing desk that used an altogether different set up. He set about figuring out how it worked in the old-fashioned way—by pulling it apart.

The Kloud desk relies on pneumatics rather than electrical actuators to move up and down. Inside the desk sits a small tank that can be pressurized with a hand-cranked mechanism. A lever can then be used to release pressure from this tank into a pair of pneumatic cylinders that drive the top of the desk upwards. The two cylinders are kept moving in sync by a tensioned metal ribbon that ties the two sides together. The mechanism is not unlike a gas lift chair—holding the lever and pushing down lets the desk move back down. Once he’s explained the basic mechanism, [Matthias] gets into the good stuff—pulling apart the leg actuator mechanism to show us what’s going on inside in greater detail.

If you’ve ever thought about building your own standing desk, this might be a video worth watching. We’ve featured some other great pneumatics projects before, too. Video after the break.


From Blog – Hackaday via this RSS feed

25


These days, so much of what we see online is delivered by social media algorithms. The operations of these algorithms are opaque to us; commentators forever speculate as to whether they just show us what they think we want to see, or whether they try to guide our thinking and habits in a given direction. The Digital Poison device  from [Lucretia], [Auxence] and [Ramon] aims to twist and bend the algorithm to other ends.

The concept is simple enough. The device consists of a Raspberry Pi 5 operating on a Wi-Fi network. The Pi is set up with scripts to endlessly play one or more select YouTube videos on a loop. The videos aren’t to be watched by anyone; the device merely streams them to rack up play counts and send data to YouTube’s recommendation algorithm. The idea is that as the device plays certain videos, it will skew what YouTube recommends to users sharing the same WiFi network based on perceived viewer behavior.

To achieve subtle influence, the device is built inside an unobtrusive container. The idea being that it could be quietly connected to a given WiFi network to stream endlessly, in turn subtly influencing the view habits of other users on the same network.

It’s difficult to say how well this concept would work in practice. In many cases, sites like YouTube have robust user tracking that feeds into recommendation algorithms. Activity from a random user signed into the same network might not have much of an influence. However, conceptually, it’s quite interesting, and the developers have investigated ways to log the devices operation and compare it to recommendations fed to users on the network. Privacy provisions make this difficult, but it may be possible to pursue further research in this area. Files are on Github for the curious.

Ultimately, algorithms will always be a controversial thing as long as the public can’t see how they work or what they do. If you’re working on any projects of your own in this space, don’t hesitate to let us know!

[Thanks to Asher for the tip!]


From Blog – Hackaday via this RSS feed

view more: next ›